How to “remove” a word from Word's main spelling dictionary
Although you can
edit a "custom"
(user) dictionary that you have created, it is not possible to edit Word's
main spelling lexicon, but you can trick Word into thinking you have. To make Word question the spelling of a word that is
“correctly” spelled according to its dictionary, you need to add the word to an
“exclusion” dictionary. An exclusion dictionary causes Word's spelling engine to
ignore the entries in the main dictionary for the words it contains.
This technique can be a very helpful adjunct to
AutoCorrect. For example, I frequently mistype “about” as “abut.” I could
get AutoCorrect to change “abut” to “about,” but this might happen without my
noticing it sometimes when “abut” was what I really meant. I don't use “abut”
anywhere near as often as “about,” though, so I don't mind having it marked as
misspelled (even when it isn't) if it saves me from missing a misspelled
“about.” I also made haste to add “pubic” to my exclusion dictionary when I
realized that on my business brochure I'd cited the Fairhope Pubic
Library as one of my references!
Note that the procedure for using exclusion dictionaries in
Word 2007 and above differs considerably from that in previous
versions, so make sure you read the appropriate section below.
Important Note for All Versions: You must restart
Word for the exclusion dictionary to take effect.
Word 2003 and earlier
Create the exclusion dictionary
Creating exclusion dictionaries is described in the Word
Help topic "Specify
a preferred spelling for a word." Unfortunately, the Help files and articles
on the subject are misleading and, in places, inaccurate.
-
Create your exclusion dictionary as a text file—either
using Notepad or by creating a new document in Word and, in the Save As
dialog, setting “Files of type” to “Plain Text (*.txt).” when you save it.
-
In your text file, type in the word(s) you want Word
to treat as misspelled, one word per paragraph (that is, press Enter
after each entry). In other words, you type in the "bad" spellings here.
This forces Word to ignore that entry in the dictionary.
-
Do NOT use any capital letters. Type all of your words
entirely in lowercase. If you do not, they won't match the main dictionary
entries, so they won't work.
Save the exclusion dictionary
Your next challenge is to find out what to use as the file
name for your dictionary. To do this, you need to find the name of the main
dictionary (lexicon) file. In the case of Office 2000 and above it will be
called Mssp3*.lex, where * represents your language. In Office 97,
the file is Mssp2_*.lex.
-
First look in the following path:
<systemdrive>:\Program Files\Common Files\Microsoft
Shared\Proof
Systemdrive stands for the name of the drive in
which Windows is installed (usually “C”).
-
Pray that you see a file named MSSP3EN.LEX in
there. If you do, you've found the main English dictionary.
-
If you do not see that file, use Search in
Windows Explorer (My Computer) to search your Program Files
folder for MSSP*.LEX. Make sure you click More advanced options
and specify that the search is to look in Hidden folders and System folders,
or you will not find anything.
-
If you work in American, Canadian, or UK English, your
main dictionary is named MSSP3EN.LEX, so your exclusion dictionary must be
named MSSP3EN.EXC.
If you work in other languages, the names are:
| Language |
Dictionary |
Exclusion Dictionary |
| Office 2000 and above |
|
|
| Australian |
MSSP3ENA.LEX |
MSSP3ENA.EXC |
| Spanish |
MSSP3ES.LEX |
MSSP3ES.EXC |
| French |
MSSP3FR.LEX |
MSSP3FR.EXC |
| Office 97 |
|
|
| Australian |
MSSP2_ENA.LEX |
MSSP2_ENA.EXC |
| Spanish |
MSSP2_ES.LEX |
MSSP2_ES.EXC |
| French |
MSSP2_FR.LEX |
MSSP2_FR.EXC |
In other words, the exclusion
dictionary always has the same name as the main dictionary, but with an .exc
file extension instead of .lex.
-
In Office 97, you save the file in the Proof
folder where the main dictionary resides.
In Office 2000 and above, you must save the exclusion
dictionary in the Proof folder where your custom dictionary is
stored. This should be:
<homedrive>:\Documents and Settings\user name\Application
Data\Microsoft\Proof
Where <homedrive> is usually "C:" drive.
Unfortunately, it sometimes isn't. So you may need to
force Word to tell you where it is. In Word 2003, do the following:
-
Go to Tools | Options | Spelling & Grammar and
click on Custom Dictionaries…
-
At the bottom of that dialog, the path to your custom
dictionary is shown. Regrettably, the dialog is not usually large enough to
read the full path.
-
Click the New button on the right. You will see
the following dialog:
-
Follow the instructions in the Help topic and save your
exclusion dictionary in this location.
Use the exclusion dictionary
Once you have saved the exclusion dictionary, you can make
it much easier to use:
-
Go to Tools | Options | Spelling & Grammar and
click on Custom Dictionaries…
-
In the Custom Dictionaries dialog, click Add,
which will open the folder where CUSTOM.DIC is stored.
-
Change “Files of type” to “All Files (*.*).” You should
see your exclusion dictionary listed.
-
Select your exclusion dictionary and click OK.
-
Your exclusion dictionary will now be listed in the
Custom Dictionaries dialog. When you want to add a word to it, you can
select it, choose Modify…, and add words as required.
Before you try to use an exclusion dictionary in Word 2007, 2010,
or 2013, you might want to read
this blog post from Microsoft's Natural Language Group, which explains why
the contextual spell checking feature may make the exclusion dictionary
unnecessary. If you still want to pursue it, however, this section will tell
you. You may want to read the material above for general
principles, but in Word 2007 and above you don’t have to create an exclusion dictionary;
Microsoft has already done that for you. The challenge instead is to locate the
correct dictionary for the language you are using. [Before you start, however,
note that Canadian Christopher Rath of Thought-Sight Consulting, Inc., has
created an add-in to add words to the exclusion dictionary automatically. Find
it
here.]
Note: It would appear that these dictionaries are
created when you use or enable a given language. Each dictionary will be
applied only to text in the language specified.
Find the dictionary
-
Open Microsoft Windows Explorer (My Computer or
Computer). An easy way to do this is with the keyboard shortcut Winkey+E,
where “Winkey” is the Windows key on your keyboard (the one with the  Windows
logo on it). Windows
logo on it).
-
Navigate to the location where custom dictionaries are
stored. The location is usually one of the following:
If you don’t see this folder, do the following:
-
If the menu bar is not displayed, display it by
pressing Alt. On the menu bar, click Organize, then
Folder and Search Options. (Tip: You can keep the menu bar
visible by choosing Organize | Layout and checking the Menus
option.)
If you don’t see this folder, do the following:
-
On the menu bar, click Tools, then Folder
Options.
-
Click the View tab of the Folder Options
dialog.
-
In the Files and Folders section, under
Hidden files and folders, click the button for “Show hidden files
and folders.”
-
Locate the exclusion dictionary for the language whose
settings you want to change. The name of the file you need to open is
ExcludeDictionaryLanguage CodeLanguage LCID.lex.
-
The Language Code is a two-letter code such as EN
for English or FR for French.
-
The Language LCID (Locale ID) is a four-digit
numeric code. You can find a very complete list of these codes
here, but this chart does not include the Language Codes. The chart
here is not as complete but does include the Language Codes.
For a sortable list that includes all these values, see
here. In all
instances, the last four digits of the hex value (not the decimal value) are
what you want.
-
As examples, here are the presumed exclusion dictionary
names for the various flavors of English (I don’t guarantee that they all
exist):
ExcludeDictionaryEN0C09.lex: English – Australia
ExcludeDictionaryEN2809.lex: English – Belize
ExcludeDictionaryEN1009.lex: English – Canada
ExcludeDictionaryEN2409.lex: English – Caribbean
ExcludeDictionaryEN3C09.lex: English – Hong Kong – SAR
ExcludeDictionaryEN4009.lex: English – India
ExcludeDictionaryEN3809.lex: English – Indonesia
ExcludeDictionaryEN1809.lex: English – Ireland
ExcludeDictionaryEN2009.lex: English – Jamaica
ExcludeDictionaryEN4409.lex: English – Malaysia
ExcludeDictionaryEN1409.lex: English – New Zealand
ExcludeDictionaryEN3409.lex: English – Philippines
ExcludeDictionaryEN4809.lex: English – Singapore
ExcludeDictionaryEN1C09.lex: English – South Africa
ExcludeDictionaryEN2C09.lex: English – Trinidad
ExcludeDictionaryEN0809.lex: English – United Kingdom
ExcludeDictionaryEN0409.lex: English – United States
ExcludeDictionaryEN3009.lex: English – Zimbabwe
-
As you can see, there is much more granularity of
language differentiation in the exclusion dictionaries in Word 2007 and 2010 than in
previous versions (where a single dictionary was used for U.S., U.K., and
Canadian English, for example). Note also that the file uses the
“dictionary” suffix .lex rather than .exc as in previous versions.
Edit the dictionary
-
Edit the file using the text editor of your choice (such
as Notepad or WordPad).
-
Add each word that you want the spelling checker to flag
as misspelled. Be sure to type the words in all lowercase letters, and press
ENTER after each word.
-
Save and close the file.
Note: In order to open a *.lex file in Notepad or
WordPad, you may have to negotiate the mysteries of file type associations.
In Windows XP, if you right-click on, say, ExcludeDictionaryEN0409.lex, then
Open With, you may be offered Notepad or WordPad as an option. If not, you
can use Choose Program and get a list in which you can scroll down to the
desired one. In Windows 7 (and probably Vista as well), you instead get the
dialog shown below:
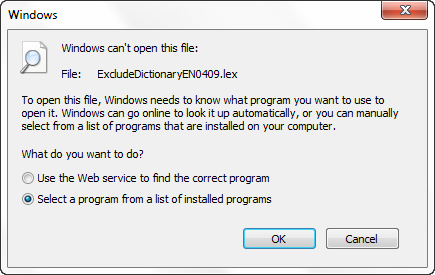
If you select the radio button for "Select a program
from a list of installed programs," then you will get a modest list of
applications from which you can choose Notepad or WordPad. If you leave the
box checked (as it is by default) for "Always use the selected program to
open this type of file," then the next time you want to open the exclude
dictionary, you can just double-click on it.
Fortunately, in Windows 10 and 11, Notepad is offered by
default.
Going forward
Once you have found the appropriate dictionary file and
added words to it, you have passed the highest hurdle. Unfortunately, unlike
previous versions, Word 2007 and above don’t allow you to open and edit the exclusion
dictionary through the Custom Dictionaries dialog. You get this terse
dialog:

Therefore, if you want
to make it easy to open and edit the file, you may want to create a desktop
shortcut to it, add it to your Favorites, or, if you are editing it as a text
file in Word, pin it to the file list under the Office Button (Word 2007) or on
the File tab (Word 2010 and above).
Important Note: Don't forget that, after you have
edited the exclusion dictionary, you must restart Word before changes will
take effect.
This article copyright © 2000, 2002,
2009, 2011, 2012, 2014, 2023 by
Suzanne S. Barnhill.
|