

|
|
|
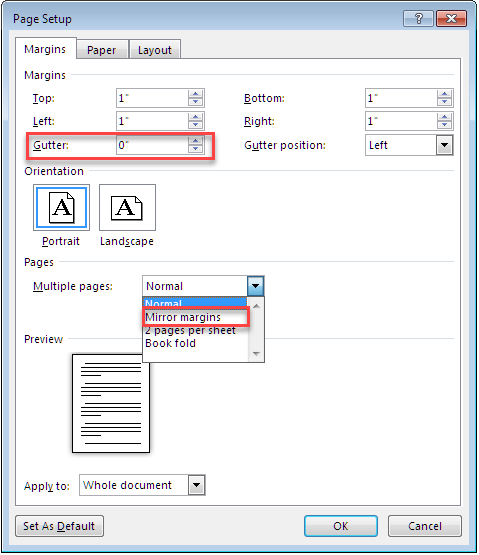
Any Word document more complex than a letter is likely to need to be bound in some way, whether it is a report bound into a report folder or a bound book. Some forms of binding don’t require special treatment; for example, comb binding and spiral binding leave the entire page exposed. But in cases where a portion of the page (usually the left or top edge) will be hidden, the margins of the Word document must take this into account. Word provides two ways to provide for binding, both found on the Margins tab of the Page Setup dialog: the Gutter setting in the Margins area and the Mirror margins setting in the Multiple pages dropdown. They can be used in concert but in some situations are mutually exclusive.
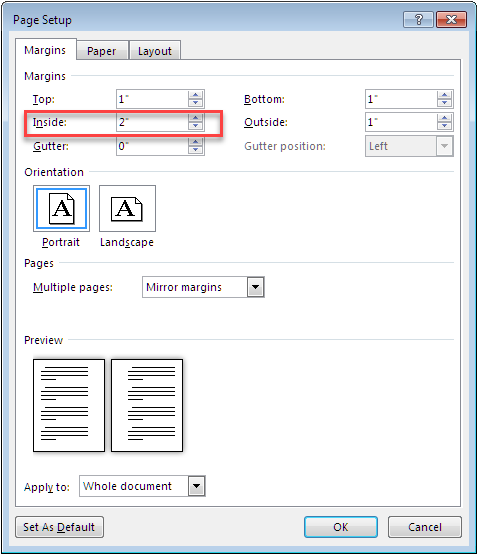
Mirror marginsWhen you are creating a document that will be printed on both sides of the paper (duplexed), you may wish to have a larger margin on one side of the page. If you enable the Mirror margins option, the settings for Left and Right margins are changed to Inside and Outside. You can set a larger margin for the inside (exaggerated for effect here), and you will see (as shown in the preview) that the larger margin alternates from right (on the verso or even pages) to left (on the recto or odd pages).
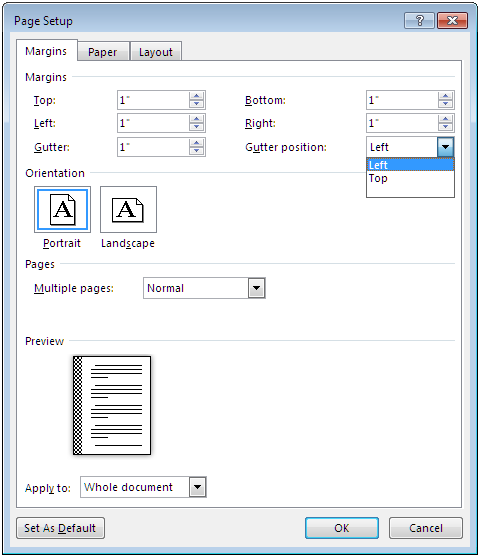
If you choose Book fold, mirror margins are enabled automatically. Page gutterThe “gutter” of a bound document such as a book is the area where the page disappears into the binding. If you specify a gutter measurement in the Page Setup dialog, this amount will be applied to the margin on the selected edge. Note that you have a choice of Left and Top. Using the Left setting has the same effect as adding the equivalent amount to the left margin, but use it if the preview helps you visualize how your document will be printed.
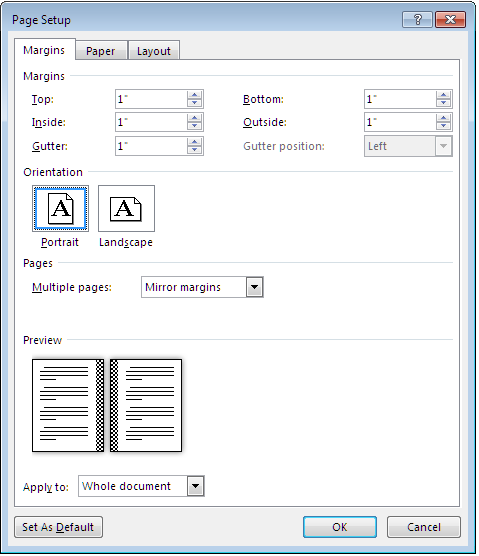
The Top setting is of limited usefulness. Use it when you are creating a document (portrait or landscape) that will be bound at the top or placed in a clipboard but printed on only one side. The Left gutter setting can be combined with mirror margins, as shown below. In effect, a 1″ Inside margin combined with a 1″ gutter is the same as a 2″ inside margin.
If you enable mirror margins with a Top gutter setting, it will be changed to Left, making it useless for duplex documents. Documents with mixed orientationAll of this is quite straightforward until you want mirror margins in a portrait document with some landscape pages. Let’s say you have 1″ Top, Bottom, and Outside margins and a 1.25″ Inside margin (or a 1″ margin and a 0.25″ gutter) on your portrait pages. By convention, landscape pages (whether recto or verso) are oriented with the top of the page to the left. This means that the top of the page will alternate from Outside (on verso pages) to Inside (on recto pages).
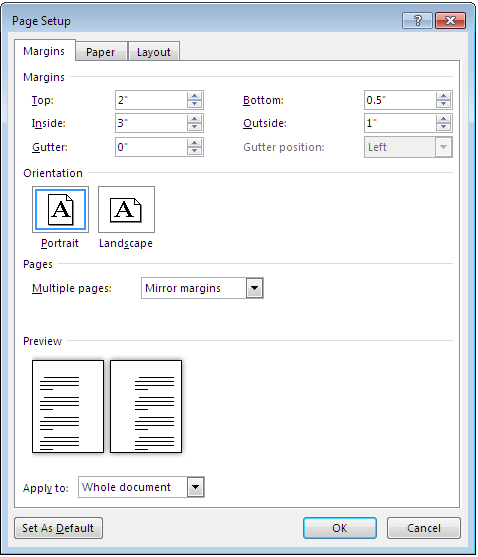
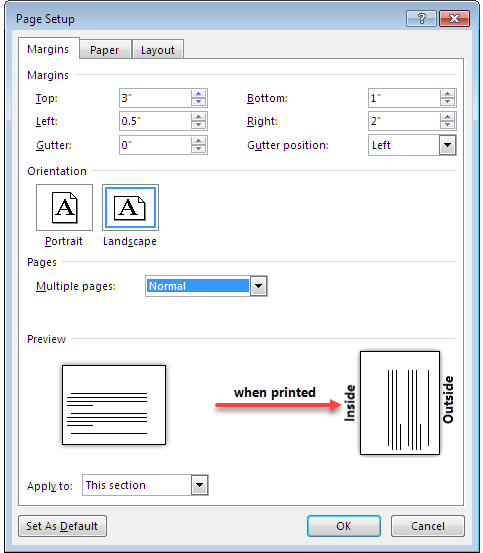
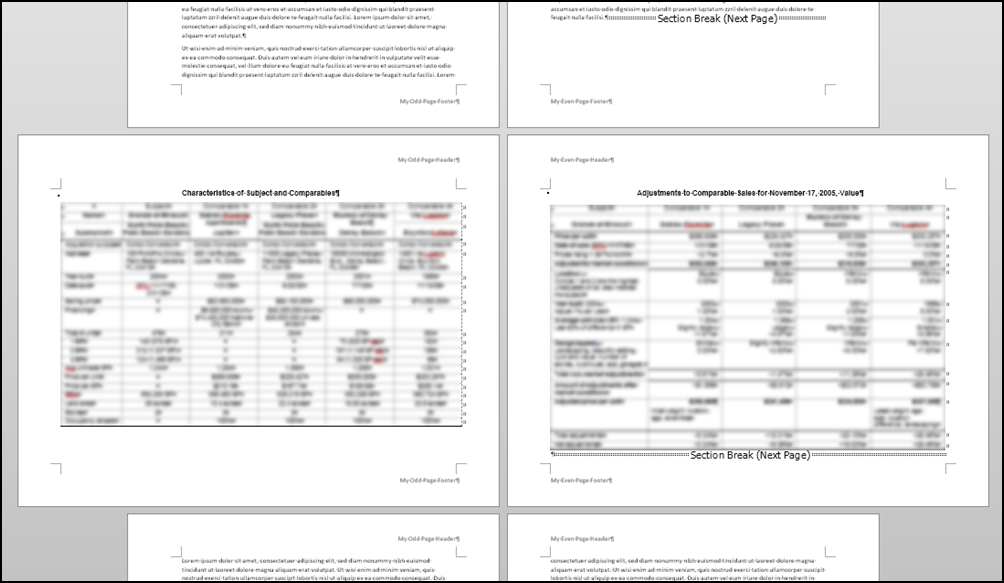
In order to allow for binding, you need to have 1.25″ at the top of the recto (odd) pages (which will be the left or inside edge) and 1.25″ at the bottom of the verso (even) pages. There is, unfortunately, nothing in the Word UI that allows you to do this automatically, but it can be done! First, let’s see what Word gives you by default. Word’s default layoutIn the screen shots that follow, the margins have been exaggerated for effect. The portrait section is set up with a 3″ Inside margin, 1″ Outside margin, 2″ Top margin, and 0.5″ Bottom margin. You can see in the preview that the Inside margin alternates from right to left.
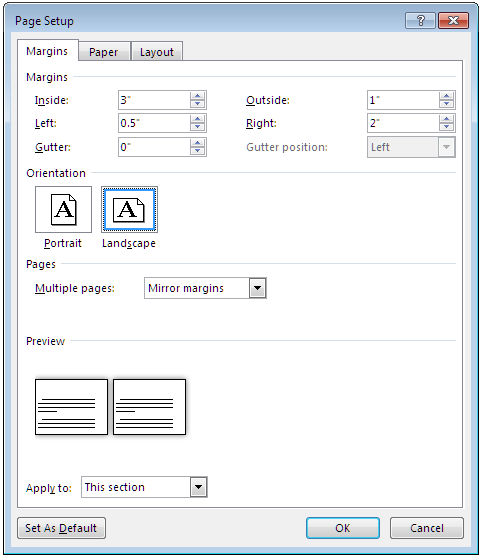
If you insert a section and set the page orientation to landscape, with Mirror margins still selected, you get this result. Note that the “Inside” margin is actually at the top of both pages.
It is clear that Mirror margins (with or without a gutter) is not going to do what you need for a landscape section, so a different approach is required. Although “Mirror margins” is a setting that applies to the entire document and cannot be changed for a single section, you may find it helpful to change the Multiple pages setting to Normal just temporarily while you are working with the landscape section. You will get the same result, but the “Inside” and “Outside” margins will now be correctly identified as Top and Bottom, which is less confusing.
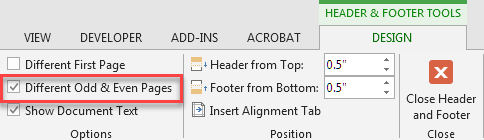
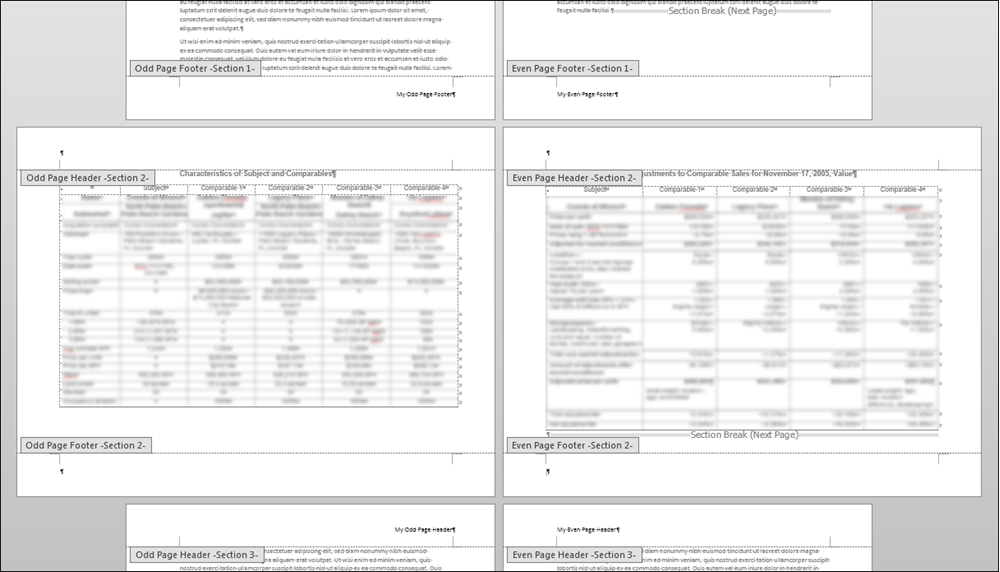
An additional effect is that the Top and Bottom margins have become Right and Left, which is very convenient because it means that the top and bottom margins of the page when viewed in portrait orientation will be the same as in the rest of the document. The sections below explain the other changes you will have to make to achieve the effect of mirrored Top and Bottom margins (Inside and Outside of the page when viewed in portrait orientation). Change the margins of the landscape sectionThe Bottom margin (which is the Outside margin in portrait orientation) will still be correct. Change the Top margin to equal that. Enable Different Odd and EvenThe next thing you will have to do is provide for different headers and footers on odd and even pages. Since you’re creating a duplex document, you’ve possibly already done this. If not, double-click in the header of any section and, in the Options group on the contextual Header & Footer Tools | Design tab, click Different Odd & Even Pages. (In Word 2016 and above, this tab is labeled just Header & Footer.)
This is a document setting that affects all sections, so you will have an Odd Page Header/Footer and an Even Page Header/Footer in every section, which you can format separately and into which you can put different content (in books, for example, it is common to put the book title in one header and the author’s name or chapter title in the other). The screen shot below shows an example of the use of odd and even headers.
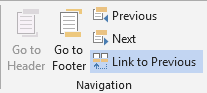
Unlink the landscape sectionNext you must unlink the relevant header and footer of the landscape section from those of the portrait sections preceding and following it. You will need to unlink the Odd Page Header and the Even Page Footer. Double-click in the Odd Page header of the landscape section and, in the Navigation group on the contextual tab, click Link to Previous to turn it off.
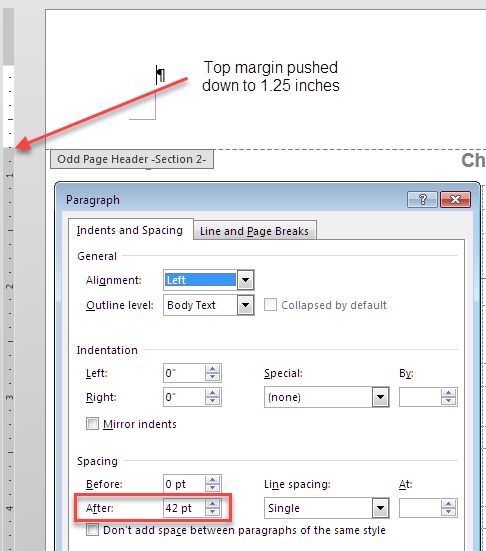
Click Next until you get to the Odd Page Header in the portrait section following the landscape section and again turn off Link to Previous. Return to the landscape section and select the Even Page Footer. Unlink it, click Next to get to the Even Page Footer in the portrait section, and unlink that. You may want to unlink both odd and even headers and footers in the landscape and following sections, just for completeness but especially if you plan to add a portrait header and footer (see below). Modify the Odd Page HeaderOpen the Odd Page Header and right-click in the last line of header text.
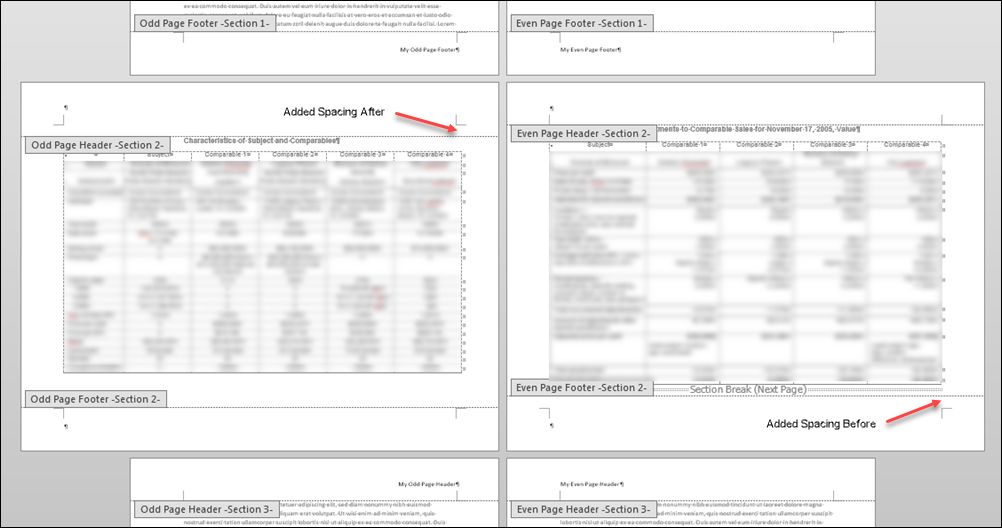
On the right-click context menu, select Paragraph… to open the Paragraph dialog. Add some Spacing After. This will require some trial and error, but if you have a single line of text at the default 0.5″ header margin, the amount required to push the top margin down to 1.25″ will be somewhere between 42 and 48 points.
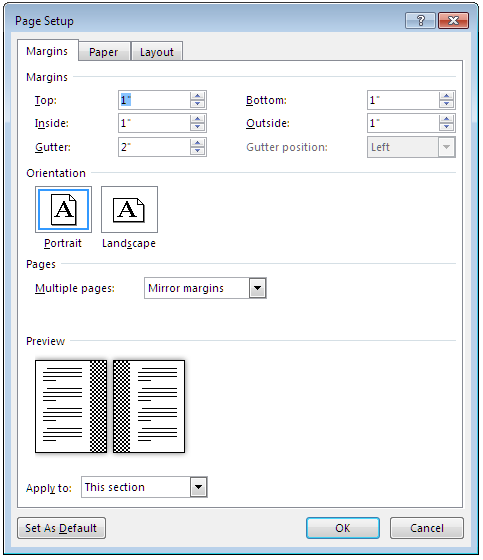
Fill a page with text and test the result by printing it. Modify the Even Page FooterRepeat the process for the Even Page Footer, adding Spacing Before to the top line of the header text. Review of the ProcessThe screen shots below show a sample document as the changes described above are made. This one shows a landscape section with Mirror Margins before any adjustments have been made. The top margin is 1.25″ and the bottom and sides are 1″.
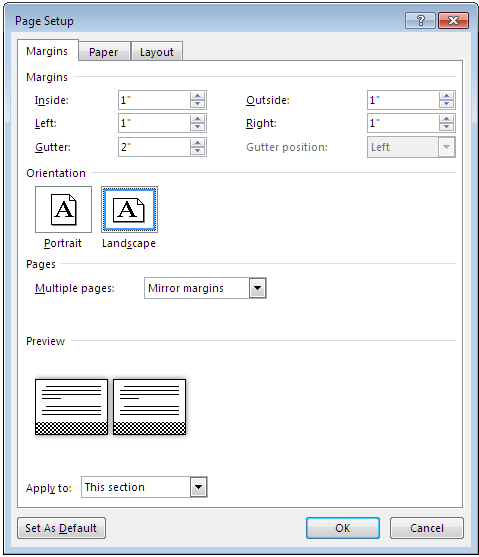
Landscape section before margin adjustment In the view below, the top margin has been changed to 1″ and the header and footer content removed.
Landscape section after first margin adjustment In this final view, the Odd Page Header has been increased to 1.25″ by using Spacing After, and the Even Page Footer has been increased to 1.25″ by using Spacing Before.
Landscape section after final margin adjustment Once you have achieved the desired effect, you will need to restore the “Mirror margins” setting for the entire document.Alternative methodsIt may occur to you that, instead of using the trial-and-error method of determining the required amount of Spacing Before/After, it might be easier to simply insert a text box or shape in the header and footer. This can be set to exact dimensions and placed in an exact location, so it might indeed be easier. But it adds to the complexity of the document, which puts a heavier load on Word than simple paragraph text. Once you have arrived at the Spacing Before/After solution via trial and error, you can save the header/footer as a style or an AutoText entry. Another approach avoids using a landscape section altogether. If you can have landscape content on a portrait page, there will be no problem with mirror margins or with placement of header and footer content. This is more practical when the page content will not need to be edited. For example, if you have a large photo that will fill most of the page, you can insert it on the portrait page and rotate it to landscape orientation. If you need a caption, this can be inserted in a rotated text box. These objects will be wrapped (not In Line With Text), so they will have to be anchored to an empty paragraph on the page. A table is a little more difficult. Tables, even wrapped ones, can’t be rotated. You can put a table in a text box, but you can’t change the text direction of a text box containing a table. You can, however, rotate the entire text box containing the table. Again, it will have to be anchored to an empty paragraph on the page. If your table fills more than one page, you can actually link the text box on one page to a text box on the next so that content will flow freely between them. (But your header row(s) will not repeat.) When you need to edit the table, you may find it necessary to temporarily rotate the text box so that the text runs horizontally. If the table does not need to be edited, it will be easier to copy it and paste it as a picture, which you can then rotate as you would any other picture. (You may, however, find that tables don’t convert well to pictures. It may be possible to get a good screen shot that will work better.) This article copyright © 2018, 2020, 2023 by Suzanne S. Barnhill. |