|
Despite being surprisingly well documented in Word’s online
Help file, the StyleRef field may be one of Word’s least noticed—and
consequently least used—fields. Users who discover it (or have it pointed out to
them), however, almost always welcome it gratefully.
The basic Support topic, “Field codes: StyleRef field,”
provides the usual succinct Syntax, Instructions, Switches, and Examples and goes on to
provide more information about how the field behaves depending on where it is
inserted in the document. Another Help topic, “Create a dictionary-style page
header” (apparently no longer available, but there’s third-party substitute
here), told how to use two slightly different StyleRef fields to pick up the
first and last word (or heading) on a page; for a substitute tutorial, see
here. Additional basic information on the use of StyleRef
fields can be found in the “Beyond numbering” section of my article “How
to set up a document with front matter numbered separately” (that article is
for Word 2007 and above; for Word 2003 and earlier, see
here.)
Although this article is intended to go beyond these
applications to
describe some additional ways to use StyleRef fields referencing character
styles, I'll start with some quick tips on creating character styles and
inserting StyleRef fields. If you already know how to do this, skip to "Picking
up part of a heading," “Suppressing a StyleRef
field,” "Repeating form field data in
a header/footer," or "Customizing table of contents entries."
How to insert a StyleRef field
There are two ways to insert a StyleRef field (or any other
field): using the Field dialog or creating the field by hand.
Use the Field dialog
To open the dialog:
-
Word 2003 and earlier: On the Insert menu,
click Field...
-
Word 2007 and above: One the Insert tab of
the Ribbon, in the Text group, click the button for Quick Parts
or Explore Quick Parts and select Field... from the dropdown
menu.
When you select the StyleRef field in the “Field names” list, you will be
presented with a list of all the styles currently in use in the document
(see Figure 1). Just select the one you want to reference and click OK. It’s
that easy!
Figure 1. The Field dialog showing insertion of
StyleRef field
Create the field by hand
To insert the field by hand, press Ctrl+F9 to insert
a pair of field delimiters (the things that look like braces but can't be
entered from the keyboard). Between them, type STYLEREF and the exact name
of the style you want to reference, enclosed in quotation marks. In the
example shown in Figure 1, the field would be { STYLEREF "Heading 1" }.
Important Note: StyleRef fields are
language-sensitive because style names vary by language. For the built-in
heading styles, you can get away with using just the level number: { STYLEREF 1 }.
For other styles, see the information in fellow MVP Lene Fredborg's article,
“STYLEREF
Fields and Language-specific Style Names.”
How to create a character style
Although a StyleRef field is often used to pick up text
formatted with a specific paragraph style (as in Figure 1), certain tricks can
be accomplished only by using a character style.
A character style is a form of direct font formatting that
can combine several font properties. For example, one of Word’s built-in
character styles (the Hyperlink style) applies both blue font color and underlining.
If you look at the styles listed in Word’s Style dialog (or the Styles and
Formatting task pane in Word 2002 or 2003 or Styles pane in Word 2007
and above), the ones marked with a are
character styles; those marked with ¶ are paragraph styles. (Word 2007 adds
further complexity to the marking, but the character styles are still
recognizable.)
You'll see that many of the character styles don’t really
have any special formatting: they're just defined as “Default Paragraph Font +,”
which means that they don’t add anything to the underlying font formatting
except a name (which can be helpful in searching for text so marked or for
changing it to a different formatting). The character style you want to create
for the tricks described below will be of this type. Here’s how to do it.
-
Open the Style dialog.
-
Word 2002 or
2003: Click the Styles and Formatting button on the Formatting
toolbar (or select Styles and Formatting... from the
Format menu) to display the Styles and Formatting task pane.
In that pane, click the New Style button.
-
Word 2007 or above: Use the
dialog launcher in the Styles group on the Home tab (or the
keyboard shortcut Alt+Ctrl+Shift+S) to open
the Styles pane, then click the New Style button.
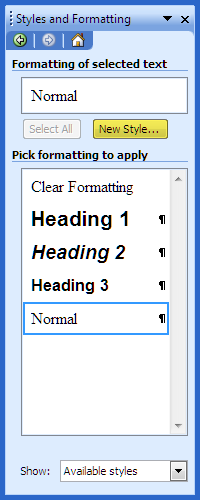

Figure 2. The Styles pane showing the New
Style button (Word 2003 left; Word 2010 right)
-
In Word 2003, the result will be the New Style dialog
(Figure 3a); in Word 2007 and above, you’ll get the Create New
Style from Formatting dialog (Figure 3b). In either of these dialogs, type a name for your
style, select Character for the style type, and make sure that
Default Paragraph Font is listed for the “based on” style.
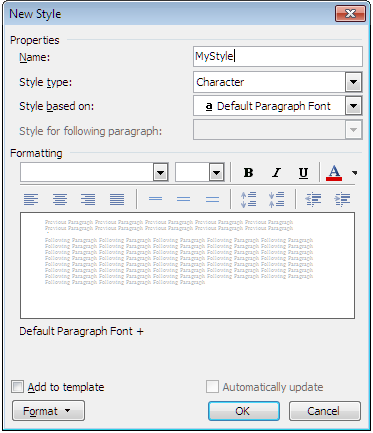
Figure 3a. The New Style dialog in Word 2003
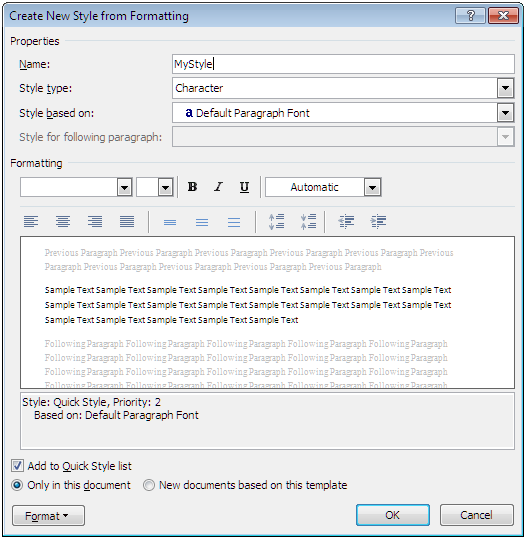
Figure 3b. The Create New Style from Formatting
dialog in Word 2010
-
Click OK. You're done! To apply this style, select
(highlight) the desired text and then use whatever method you usually use to
apply a style. These can include:
-
Word 2003: Select the style from the Style
dropdown list on the Formatting toolbar.or from the Styles and
Formatting task pane.
-
Word 2007 and above:
-
Select the style from the Styles pane.
-
If you have added the classic Styles
dropdown to your Quick Access Toolbar, you can use that.
-
You can use Alt+Shift+S to open the
Apply Styles pane. This is a floating toolbar that can be kept
open while you work; it takes up less screen space than the
Styles pane. You can select a style from the dropdown list or
start typing the name to invoke AutoComplete.
-
If you left the “Add to Quick Style list” box
checked (as shown in Figure 3b), you can find the style in the Quick
Styles gallery.
-
Any version: If you will be using the style
frequently, you may want to
assign a keyboard shortcut
for it.
Note: If you are creating this style in a document
rather than in a template, you can check the “Add to template” box in the New Style
dialog to save the style to the template so that it will be available in any new
document based on that template. In Word 2007 and above, you can select the radio button
labeled “New documents based on this template” to accomplish the same thing.
One of the most common uses of StyleRef fields is to pick up
chapter titles in the headers (“running heads”) of books and other long
documents. If Heading 1 is used for the chapter title, this is accomplished by
putting a { STYLEREF "Heading 1" } field in the Header, Odd Page Header,
and/or Even
Page Header.
But what if your chapter title is very long or contains line
breaks? Including the entire title will affect the formatting of the header,
creating results that are at best unattractive (see Figure 4). If you are the
author of the document, you may find it expedient to shorten the title itself,
but if you have no control over the title text, here’s the workaround.
Figure 4. The result of using a StyleRef field in the
document header
to pick up a heading that is too long and contains a line break
-
Create a character style called, say, “Short Title.”
Base it on the Default Paragraph Font with no other attributes. That is, the
Short Title style does not affect the appearance of your heading at all; it
just overlays the paragraph style invisibly. (In the figures, the Short
Title style has been given a red font color for illustration purposes.)
-
Now use the field { STYLEREF "Short Title" } in your
header.
-
Apply the Short Title style to the portion of your
heading that you want to appear in your running head (see Figure 5).
Figure 5. The result of using a StyleRef field in the
document header
to pick up a character style applied to part of the heading
Caveats
-
You will need to apply the character style to every
chapter title, even the ones you want included in their entirety.
-
Although it is useful to have
nonprinting characters displayed when you are doing this, be aware that,
even if you carefully select everything except the paragraph mark
(¶), Word will still apply the style to the entire paragraph. This means
that there will be an unwanted paragraph break in the header. For titles
where you have selected the entire title or the last few words of the title,
you will have to go back and select just the paragraph mark and press
Ctrl+Spacebar to remove the character style. This applies to line
breaks as well: if you have a two-line heading, broken with a line break
(Shift+Enter) and want to apply your character style to just the
second line, no matter how carefully you apply the style to just the text,
carefully omitting the line break and paragraph break, you may find that
Word "helpfully" applies the style to both, and you will have to go back and
remove it (Ctrl+Spacebar).
-
The StyleRef field (absent any switches) will pick up
only the first occurrence of the style on the page (see Figure 6). This
means that you can’t pick up noncontiguous parts of the title: you have to
select a continuous phrase to be repeated in the header.
Figure 6. Illustrates that a StyleRef field will pick
up only the first text
formatted with the referenced style
-
The character style can be applied only to some or all
of the existing title. It might occur to you that you could fake this by
inserting some Hidden text in the existing title (see Figures 7 and 8).
Unfortunately (and maddeningly), the Hidden property is the only
direct font formatting that the StyleRef field does pick up. This is a
limitation of the StyleRef field as opposed to typing directly in the
header: you can apply a font format to the StyleRef field itself (that is,
you can, for example, make all of this portion of the header italic), but
the StyleRef field won’t reflect direct font formatting in your heading (if,
for example, you have italicized one or a few words). Figure 9 illustrates
this concept.
Figure 7. Shows that a StyleRef field will not pick up
Hidden text
Figure 8. The text shown in Figure 4, with field codes
displayed
to illustrate that the StyleRef field is present but not displaying anything,
not even as Hidden text
Figure 9. Note that the StyleRef field does not pick up
the italics applied to King Lear
-
You may wonder what happens if you still need a line
break in your very long title and the part you want to include in the header
includes the line break. Well, if you actually use a line break in the
title, then there will be a line break in the header. But there is a way
around using a line break. As an example, take the very long title in Figure
1: “A Chapter Title That Is Too Long to Fit Comfortably in the Header.”
Instead of inserting a line break after “Long,” replace the spaces between
all the following words with nonbreaking spaces (Ctrl+Shift+Space).
This will force the entire block of text (“to Fit Comfortably in the
Header”) to the next line without requiring a line break. You may then, if
you like, apply the Short Title style to, say, “A Chapter Title That Is Too
Long to Fit” (see Figure 10).
Figure 10. StyleRef field picking up text that appears
to have a line break
Of course, you can also force the heading to wrap by
applying a right indent as required, and this may be preferable if you are
also creating a table of contents, as the nonbreaking spaces might cause
lines in the TOC to wrap short of where you want them to.
Note: The figures in this article are not meant to
represent actual documents. Naturally, in a real book or manuscript, there would
not be a running head on the first page of a chapter (see below for one way to
accomplish that). For purposes of
illustration using a single screen shot, the “chapter title” and header appear
on the same page. Moreover, default paragraph styles have been used; no effort
has been made to approximate the look of a real book.
As we have seen above (Caveat #4), Hidden formatting is the
only font formatting that a StyleRef field picks up. You can use this to your
advantage, however, in combination with the default behavior of StyleRef fields:
-
On any given page, a StyleRef field in a header or
footer will pick up the first text on the page that is formatted with the
referenced style.
-
If there is no text on the page formatted with that
style, it will look for the last previous text in that style.
What this means for you is that if you have a heading on one
page that you want picked up in the headers on subsequent pages but not on the
page where it appears, you can accomplish this in one of two ways:
-
You can precede the heading with an empty, Hidden
paragraph in the same style. On the first page, Word will pick up the empty
paragraph (it doesn’t actually have to be Hidden as long as it’s empty, but
it will need to be Hidden if you don’t want it to take up space). This will
work for either paragraph or character styles.
-
You can include some Hidden text at the beginning of the
heading and apply the referenced style to it. This will require a character
style applied carefully. As we saw in Caveat #3 above, Word will pick up
only the first portion of text formatted with the character style, so you
will need to insert at least two characters, format both as Hidden, and
format the first with your referenced style. Then format the rest of the
paragraph with the character style. Note: Be careful not to include
the final paragraph mark in the character style; see Caveat #2 above.
Important Note: As noted in (1) above, an empty
paragraph in the referenced style will be picked up by the StyleRef field. If
you ever experience problems with missing text in a header or footer that
contains a StyleRef field, look for these empty paragraphs. It is helpful to
display nonprinting characters, and you can also use the Find dialog to
search for the referenced style. One place you may not think to look is in
tables: keep in mind that the end-of-cell marker (¤) functions the same as a
paragraph mark. If there is a paragraph break before the end of the cell, then
an empty paragraph has been created.
Creators of protected forms often want the data entered into
one form field to be repeated in several other places on the form. The usual way
to do this is to
use a REF field to cross-reference the built-in bookmark of the form field.
This works well in the document body, but REF fields in the header or footer of
a protected form do not update automatically, so this solution does not work
well for inserting data
in a header or footer.
You can, however, do this easily with a StyleRef field.
-
Again, create a character style. You can give it the
same name as the bookmark of your form field (see Figure 11). Base it on the
Default Paragraph Font with no other attributes. That is, the character
style does not affect the appearance of your form field at all; it just
overlays the paragraph style invisibly.
Figure 11. The Text Form Field Options dialog for a form
field with the bookmark “Name”
-
Apply the style to the form field.
-
In the header or footer, insert a StyleRef field to pick
up the style you created (see Figure 12).
Figure 12. StyleRef field referencing the
“Name”
character style,
which has been applied to the Name text form field
The beauty of the StyleRef field is that it updates
automatically and instantly, as soon as data is entered in the form field (see
Figure 13). [Note: This is true only in headers and footers. In the body
of the document, StyleRef fields, like most other fields, have to be updated
manually using F9 or by switching to Print Preview.]
Figure 13. Result of entering a name in the Name text
form field
Recently I had a question from a user who wanted an unusual
type of TOC entry. She was using three separate paragraphs (in three distinct
styles) for Author, Title, and Subtitle headings but wanted them combined in a
single TOC entry with this format:
Author: Title. Subtitle
One way to accomplish this (though not a good one) would be
to let Word build the TOC from the individual headings, with one TOC entry for
each author, each title, and each subtitle, and then, when editing was complete,
to unlink the TOC and reformat it by hand.
My suggestion, however, was to use TC fields to build the
table of contents. To build a TOC based on TC fields, you must insert each field
separately, using the Mark Table of Contents Entry dialog. To use the
dialog, you select the text you want in the TOC and press Alt+Shift+O,
which will open the dialog with the selected text entered. The dialog also
allows you to select which TOC the entry will appear in (if you have more than
one) and what TOC level the entry will be.
Figure 14. The Mark Table of Contents Entry dialog
The field code generated by the entry shown above will be:
{ TC "A sample heading" \f C \l "2" }
To generate a TOC that uses these fields (and to omit any
other entries), you must check the box for “Table entry fields” and clear the
check boxes for “Styles” and “Outline levels” in the Table of Contents
Options dialog.
Figure 15. The Table of Contents Options dialog
Inserting TC fields is tedious at best, but it would be
especially onerous for a user to type in the text of the three headings to be
included in each TC field that would generate an entry in the “Author: Title.
Subtitle” format. There must be a better way!
There is, using StyleRef fields. Experimentation proved that
the following field would create the desired TOC entry based on three paragraphs
in styles named Author, Title, and Subtitle (they may be either paragraph or
character styles):
{ TC "{ StyleRef "Author" }: { StyleRef "Title" }. {
StyleRef "Subtitle" }" }
Each StyleRef field, when updated using F9, will
display the text of the previous paragraph in the given style, creating a TC field that will generate a TOC entry for the three paragraphs. Moreover, if
the TC field is saved as an AutoText entry, it can be easily inserted, without
editing, in each location where it is needed.
Notes:
A TC field containing StyleRef fields may not appear in a
paragraph in any of the referenced styles; this will generate an error message.
Insert the TC field in a body text paragraph after the last of the included
headings.
Because the TOC based on the example shown above will be the
main TOC and all entries will be level 1, the \f and \l switches may be omitted
(for more on the switches used in TC fields, see Word’s Help topic “Field codes: TC (Table of Contents Entry) field”).
This article copyright © 2005, 2006,
2008, 2011, 2014, 2018, 2023 by
Suzanne S. Barnhill.
|