

|
|
Word 2002: How to “put it back the way it was”Users upgrading from Word 97 or 2000 to Word 2002 are often dismayed by some of the more radical changes in the user interface. “Task panes,” “Smart Tags,” and “Paste Options” are among the intrusions that may drive them to distraction, and when they try to create a new document from an existing custom template or modify a style, they find that the familiar File | New and Format | Style dialogs are difficult to access. Some menu items have been buried one menu level deeper. New toolbar buttons have supplanted some old, familiar ones. Although it is wise to keep an open mind about Word 2002’s new features, which do offer some rather slick tricks (and make Word very user-friendly for new users), veteran users who have established work patterns may find it more helpful to know how to work around these new features.
Restoring File | NewWord’s New Document task pane has four categories: “Open a document,” “New,” “New from existing document,” and “New from template.”
At the bottom of this task pane is an important check box: “Show at startup.” Clear this check box if you think you never want to see this task pane again (you can always change your mind later). If the task pane is not displayed even though you want it or persists in being displayed when you think you’ve dismissed it, you can download the Task Pane Controller add-in from “Controlling the Task Pane, even when add-ins are present.” If you don’t use the task pane, though, and the New button on the Standard toolbar merely creates a new Blank Document, how will you get to the File | New dialog? Easy, you think: just select New… from the File menu. Surprise! This opens the New Document task pane. Perhaps in the past you’ve substituted a FileNew (New…) button for the FileNewDefault (New) button on the toolbar, so you try this again. Surprise! This also brings up the New Document task pane. If you’ve already gotten this far, you may be feeling
seriously frustrated. Luckily, the solution is not difficult. Merely select the
FileNewDialog command from the All Commands category on the Commands tab
of Tools | Customize and substitute it for the New button. By default it
does not have an icon, so you will have to copy the New button face ( If you would prefer to get to the File New dialog by selecting New… on the File menu, you can drag the FileNewDialog command there instead. Initially it will appear as Other…, but you can change the name to &New… (the ampersand will underline the N as the accelerator key). You can then change the other New… to, for example, XPNew… or (if you want it to have an accelerator key) XPN&ew. Restoring Format | StyleIf you look on the Format menu for “Style,” you’ll see it’s
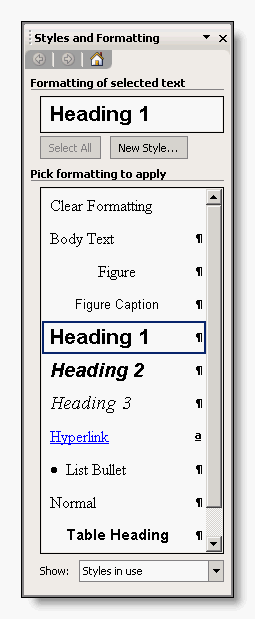
been replaced by “Styles and Formatting,” which opens the Styles and Formatting
task pane (see Figure 1). There’s also a button for this (
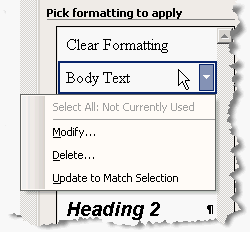
Figure 1. The Styles and Formatting task pane If you take some time to explore this task pane, however, you will see that it offers many useful features. Hover your mouse over one of the style names, and you’ll see that the defined formatting is displayed, a very useful shortcut. Moreover, the paragraph or character style icon changes to a down arrow. Click on this (or right-click on the style name), and you will get a choice of “Modify,” “Delete,” and “Update to Match Selection” (see Figure 2). “Modify” takes you to directly to the Modify Style dialog (similarly, the “New Style” button takes you directly to the New Style dialog).
Figure 2. Styles and Formatting task pane showing style options This can actually be a time saver since you don’t have to press New… or Modify… after getting to the Style dialog, and you can delete a style without going to the dialog at all. But if you want to be able to access the dialog directly as in the past (useful if you have some other task pane displayed instead of the Styles and Formatting one), you can put Style back on your Format menu (or add a Style button to your toolbar) by selecting Style from the Format category in Tools | Customize. Another nice addition to the Styles and Formatting task pane is the ability to customize what styles are displayed in the task pane and in the Style dropdown. The Show list at the bottom of the task pane has four choices: “Available styles,” “Styles in use,” “All styles,” and “Custom…” Selecting one of the first three choices determines what is displayed in the task pane itself. Custom… takes you to a dialog in which you can choose what styles are displayed for that selection (interestingly, “All styles” does not by default actually display all of Word’s built-in styles). The choices you make for “Styles in use” also affect what is displayed in the Style dropdown. Here at last is your chance to choose not to display Headings 1 through 3 or even Normal if you don’t want to see it! On the other hand, if you frequently use, say, Body Text, you can choose to have it always included. The catch here, though, is that a style must be already in use in the document before it is available to be checked in the Custom dialog. Also, the settings are for specific documents only unless you check the “Save settings in template” box. But this means that you can have different styles listed for different documents and templates. Even if you choose to avoid the Styles and Formatting task pane and go directly to Format Style, you will want to check out a related task pane, the Reveal Formatting pane. It displays the font, paragraph, and section formatting at the insertion point. You can also go directly to the relevant dialog box for changing a setting just by clicking on the appropriate hyperlink (a great way to change the “Section start,” for example). Also, if you check the box for “Distinguish style source,” it will indicate what formatting is directly applied and what is part of the style definition. Other style issuesTwo other style-related settings that you may want to change are on the Edit tab of Tools | Options. One is “Keep track of formatting.” With this feature enabled (which it is by default), Word creates a new entry in the style listing whenever you apply direct formatting to a paragraph. Although this serves as a useful reminder to novices to use styles instead of direct formatting, it can drive more experienced users to distraction. Even if you keep this feature disabled most of the time, though, you’ll want to enable it (a) to catch manual formatting that shouldn’t be there when you’re using styles, and (b) when you want to be able to select all instances of a given style (the latter feature is unfortunately disabled along with “Track formatting”). The other is “Prompt to update style,” which by default is not enabled. If you are in the habit of updating styles by example, you may already have discovered that when you try to do this in Word 2002, Word just tacitly reapplies the style instead of asking if you want to update it (this behavior is corrected by SP1). As we’ve seen, “Update to Match Selection” is one of the choices in the Styles and Formatting task pane, but if you’ve already decided you’re not going to use the task pane, you will want to check this option, which restores the behavior you’re used to. (Another approach is to add a “Redefine style” button [from the Format category in Tools | Customize] to one of your toolbars; like the command in the task pane, this works whether or not you are tracking formatting.) A third problem to watch out for is character styles. When you apply a style to a paragraph, be careful to either select the entire paragraph or collapse the selection to a single insertion point. Otherwise, Word will sometimes apply your selected style as a character style and create a new style called, for example, Heading 1 Char (this behavior is also corrected by SP1). The legitimate use of this technique is to “paint” a heading style onto the first part of a body text paragraph in order to create a run-in sidehead that will appear in the table of contents (see How to include just part of a paragraph in a table of contents). You should see this heading style in the style box if you click in the heading portion of the paragraph and the body text style if you click outside it; that is Word should apply, say, Heading 1 (which is applied as, in effect, a character style) without creating a separate Heading 1 Char style, and it correctly does this after you have applied SP1. Restoring the Mail Merge HelperIf you’ve used the new Mail Merge Wizard task pane, you probably either hate it or love it. If you hate it, you may think wistfully that the Mail Merge Helper, with all its flaws, was easier to use. Although you can restore the Mail Merge Helper (it’s listed under All Commands in Tools | Customize), you should make this a conscious decision, based on knowing the advantages and disadvantages of the two interfaces. The new interface, embodied in the Mail Merge Wizard, does actually make setting up some kinds of merges relatively easy. An excellent example is in setting up labels. If it’s the lack of overview and having to click through the multiple panes that bothers you, displaying and modifying the Mail Merge toolbar (Figure 1) could give you the best of both worlds. One serious drawback of the existing toolbar (and the Wizard) is that the Insert Merge Fields dialog is modal; that is, it does not allow you to insert a field, step out of the dialog and insert text or move the insertion point, then insert another field. This makes inserting the merge fields much more difficult than the simple dropdown list from which you could select them in previous versions. Luckily, however, you can restore the Insert Merge Field menu to your Mail Merge toolbar (find Insert Merge Field 4 in the Mail Merge category on the Commands tab of Tools | Customize).
Figure 1. The Mail Merge toolbar before modification Even better, if you don’t mind a little VBA code in your template, is to display a list of fields in a modeless UserForm. This is the way it should work! Find that macro and other useful content in a template you can download here. While you’re at it, you may also want to add a button for
Edit Data Source (MailMergeEditDataSource in the All Commands category in
Tools | Customize) since there is no other way to access your data source
directly from the merge document without using the task pane. Since this button
has the same icon as the new Mail Merge Recipients button ( Another case where you may long for the Mail Merge Helper is
in setting query options, since it is not at all obvious how to do this in Word
2002. The Mail Merge Recipients button on the Mail Merge toolbar ( Note that in the Mail Merge Recipients dialog you can select specific records to be merged; for a fairly short mailing list, this is just what a lot of users have been asking for since it makes it feasible to create very small merges from relatively large lists (for example, to address envelopes or labels to just three or four of a hundred clients). For very large databases, however, you will want to avoid
the Mail Merge Recipients dialog entirely, for two reasons. One is that the
dialog is very slow to open if your data source has many records. The other is
that a data source with more than 286 fields will crash Word when you try to
display them in this dialog. For such situations, you will want to add one more
button to your toolbar, the Start Mail Merge ( The capability to merge to Outlook also isn’t available in the Mail Merge toolbar by default. To add this capability, drag the MailMergeUseAddressBook command (from the All Commands category in Tools | Customize) to the toolbar. (Note that it uses the same data-linking method as in previous versions of Word, not the new Word 2002 OLEDB functionality.) Once you’ve learned to use the Mail Merge toolbar, you may find you don’t need the Wizard at all, but even if you use the Wizard to set up the mail merge main document initially, you will find it much easier to run repeated merges using just the toolbar. For instructions on how to set up a mail merge document efficiently using the Mail Merge toolbar, see “Express mail merges in Word 2002.” Restoring Track ChangesChange tracking or revision marking is one of the areas that has changed most radically in Word 2002. When you turn change tracking on (by choosing Track Changes from the Tools menu, pressing Ctrl+Shift+E, or double-clicking TRK on the status bar), the Reviewing toolbar appears. This toolbar provides all the functions previously found in the Track Changes dialog, as well as some new ones. One of its buttons provides access to the Reviewing Pane, where changes and comments are displayed. Other buttons allow you to skip from one change to the next or previous and accept or reject individual or all changes. The biggest innovation, though, is the use of “markup balloons” in Print Layout and Web Layout views. These appear in the right margin by default, but you can also choose the left margin on the Track Changes tab of Tools | Options. In either case, the margin is artificially enlarged to accommodate the balloons. The extra width does not have the effect of narrowing the document body, however, but is instead added to the page width. Although Print Preview shows this extra width and the balloons themselves, they do not print unless you select “Document showing markup” in the Print dialog, in which case the entire page is shrunk to fit the paper. You can also print a list of just the revisions (by choosing “List of markup”). What appears in the balloons depends on your choice from the menu on the left end of the Reviewing toolbar:
Which balloons appear can also be selected. From the Show menu, you can choose to display or hide Comments, Insertions and Deletions, and Formatting. You can also choose to view just the revisions made by specific reviewers. As in the past, you can select a specific color for revisions or let Word assign the colors by reviewer (you have no choice about these). In either case, the ScreenTips (showing the reviewer name and date/time) and Comment balloons will be filled with a tint of this color. Some users have complained that the balloon text is too small (especially when printed at reduced size). Although Word’s Help says that you can change the font used for Balloon Text and Comment Text, I have found that the results of such changes are very unpredictable (the only predictable result being the addition of another markup balloon noting the formatting change). For what it’s worth, the default styles are 8-point Tahoma for Balloon Text and 10-point Normal font for Comment Text. The Balloon Text style seems to be used for the “Inserted,” “Deleted,” “Formatted,” and “Comment” labels and Comment Text for the actual balloon text. Yet changing the size of either sometimes seems to change both. You can specify the width of the balloons. If you have many balloons close together, so that deep ones would overlap, you may want to make them wider. But, unless you choose the option to switch to landscape orientation for printing, wider balloons will result in more reduction in the size of the document text, possibly making it difficult to read. But suppose you don’t want the balloons at all? You can switch to Normal view, which does not use them, or you can disable them in the Track Changes Options. Unfortunately, this does not restore the full functionality of previous versions. Although you can still choose among several formatting options for insertions (including “(none)”), you have no choice about deletions; they are formatted as strikethrough, and there is no way to change that (this option was restored in Word 2003). But you can also choose special formatting to indicate changes in formatting itself! A major complaint is that Word doesn't offer a way to skip quickly from one change to the next: the Next and Previous buttons jump to the next or previous change, but when you accept or reject it, you are not automatically taken to the next change as in the past. This functionality can be restored by adding the ToolsReviewRevisions command to the Reviewing toolbar from the All Commands category in Tools | Customize. Another complaint Word 2002 users have is that Word no longer displays comments themselves in ScreenTips. The only way to view comments is either in balloons or in the Reviewing Pane; there is no workaround for this in Word 2002 (ScreenTips were restored in Word 2003). There is also no way to show just the change bars (“Changed lines”) without displaying the actual changes. In the last analysis, the new tools for tracking changes offer many useful features, and since there is only one small point in which you can actually “restore” the behavior of previous versions (by turning off the balloons), you may as well adapt to the new functionality. Smart Tags, Paste Options, and other annoyancesWhen you first start using Word 2002 in its default configuration, it can remind you of a jack-in-the-box, with icons and ScreenTips popping up everywhere. Although your first reaction may be to find out how to get rid of these distractions as quickly as possible, you might be better advised to take some time to find out what these features can do for you. Smart TagsSmart Tags are supposed to be the greatest thing since sliced bread, so I’m sure there must be a use for them. Maybe you’ll have figured out what it is. Maybe eventually I’ll figure out what it is, but for now I’ve chosen not to display either the tags themselves (indicated by a purple dotted underline) or their options button. Make these choices on the Smart Tags tab of Tools | AutoCorrect Options. AutoCorrect OptionsIf you have streamlined your work by adding a lot of AutoCorrect “shortcuts” (and if you haven’t, you’re missing out on one of Word’s most useful features; see “Exploiting AutoCorrect”), you probably got rid of the AutoCorrect Options button within the first five minutes. Ironically, though, this option is relatively unobtrusive and can actually be quite helpful. Every time Word performs an AutoCorrection, it adds a small blue button below the corrected text. But this button is not visible unless you mouse over it, and the options menu doesn’t expand unless you point directly at the button. When you see the Options menu, you may still think this feature is definitely for newbies. The first item gives you a chance to undo the correction—which you already know you can do with Ctrl+Z, right? But here’s the difference: Ctrl+Z (Undo) works only immediately after the AutoCorrection has been performed. If you have the AutoCorrect Options enabled, however, you can return to the corrected text anytime before you close the document to Undo the correction. Just wave your mouse over a line of text to display the blue AutoCorrect Options buttons. The Options menu also allows you to turn off the specific feature that generated the correction (such as automatic capitalization at the beginning of sentences) or remove the specific AutoCorrect entry, to add a particular case to the AutoCorrect Exceptions (if applicable), or to access the AutoCorrect Options dialog. Still, if you don’t feel you need this feature, select that last option and clear the “Show AutoCorrect Options buttons” box at the top of the dialog. Paste OptionsAnother button you may see is the Paste Options button, which can be turned off on the Edit tab of Tools | Options. If you often paste data from Excel or numbered lists from other documents, however, you may want to keep the Paste Options button, which gives you an easy way to choose the formatting of pasted material. If you have the Paste Options button enabled, it appears at the bottom of a pasted selection after you paste. Click on it to see your options, which will vary according to the context. If you are pasting ordinary paragraph text, your options will be:
If you are pasting text from the Web or from an email message, with a line break at the end of every line, you’ll see that the results of the first two of these options are identical. If you choose “Keep Text Only,” you may think you’ve made the situation even worse, since the text now has a paragraph break at the end of every line. But if you select the text and press the AutoFormat button, you will probably be pleasantly surprised by the results. If you paste text that is part of a numbered or bulleted list, you will get a variety of Paste Options depending on the context. These allow you to choose whether to merge the pasted items with an existing list, paste as a new list, and so on. For more, see “WD2002: How to Use Paste Options Pasting into a List.” Similarly, when you paste data from or into a table, you have a choice of inserting the data as a nested table, merging it with the existing table, creating new table rows, and so on. For more, see “WD2002: How to Use Paste Options Buttons to Paste Tables.” The Paste Options also allow you to choose how you want to insert data pasted from an Excel worksheet—whether you want to retain the Excel formatting or match existing Word formatting and whether or not you want to link the data. For more, see “WD2002: How to Use Paste Options to Paste from Excel.”2 Each Paste Options menu also includes an “Apply Style or Formatting” entry, which displays the Styles and Formatting task pane so that additional formatting can be applied. Note, too, that on the Edit tab you can choose the default wrapping style for pasted or inserted graphics—in line with text or with any of the varieties of text wrapping. This affects not only pictures but also inserted objects such as Equation Editor objects. Be sure to investigate the Settings for Smart Cut and Paste, too, and experiment with these to see how they affect the formatting of text you paste from one document into another. The context-sensitive Help describes these options as follows (a slightly different version can be found in the Microsoft Knowledge Base article “WD2002: General Information About Smart Cut and Paste Settings”):
The Settings dialog allows you to choose the default settings for Word 2002 or Word 97–2000. Using the Word 2002 settings, all these options are enabled except the paragraph spacing and Excel items. Only the first is selected under the Word 97–2000 setting, suggesting that the remaining options are new in Word 2002. Other changesWhen you click on a hyperlink in Word 2002, nothing happens. This behavior is by design, a response to user complaints about difficulty editing hyperlinks. If you have ScreenTips enabled, you’ll see the message “Ctrl + click to follow link.” If you are using (rather than editing) a document with hyperlinks and want to restore Word’s previous functionality, there is a check box on the Edit tab of Tools | Options where you can change this. If you have upgraded directly from Word 97 to Word 2002, you will find many other changes, especially in the area of tables. For some tips on restoring lost features in that area, see “How to fix the Word 2000+ Cell Alignment buttons” and “How to sidestep the problems of the Word 2000 (and higher) Table Properties dialog.” _______________________________ 1Whatever you do, do not select “(Blank)” in a column that contains no blank fields. This will throw you into a loop from which you cannot exit except by terminating Word, and since the Mail Merge Recipients dialog is modal, you cannot even save or close other open documents before aborting—major disaster! 2I would advise caution using the “Match Destination Table Style” or “Match Destination Formatting and Link to Excel” options. I found that selecting either of these would reliably crash Word; this may have been corrected by SP1. This article copyright © 2002, 2004 by Suzanne S. Barnhill. |