Is there life after “Reveal Codes”?
One of the questions most commonly asked by migrants to Word
from WordPerfect is, “Where is Reveal Codes?” or “Does Word have anything like
Reveal Codes?”
There is nothing in Word directly comparable to Reveal Codes
in WordPerfect. There is a very good reason for this. WordPerfect can be thought
of (and I understand is) basically a text stream with codes interspersed (for
more on this, see John McGhie's article on
Word vs. WordPerfect). This is what you see when you Reveal Codes. You have
codes or markers that turn on and off certain formatting characteristics
(similar to the <b> and <\b> codes to turn bold on and off in HTML).
Word, on the other hand, is a series of nesting containers:
characters inside words inside paragraphs inside sections inside documents. The
formatting of these is by styles and by pointers at the beginning and end of the
document. I am reliably informed that if you open a Word document (Word 2003 and
earlier) in a hex editor, you see a forest of gibberish at the beginning and end
that represent these codes and pointers (you can get a small idea of this by
opening a document using the Recover Text from Any File setting under
“Files of type” or “All Files” in the File Open dialog). So Reveal Codes, even if there were
such a thing in Word, would not be very helpful. But there are many helpful cues
and clues in Word if you know how to use them.
Reveal Formatting
The feature commonly touted as Word's equivalent to Reveal
Codes in earlier versions was the “What's This?” button on the Help
menu. Click on that (or press Shift+F1), then click in a paragraph, and
you'd get information about formatting applied both by the style and directly.
Rarely, however, did this tell you much more than you could tell by just looking
at the paragraph on the screen.
The “What’s This?” button has been replaced in Word 2002 and
above by the Reveal Formatting task pane, which gives you specific
information about the text at the insertion point (font, paragraph, and even
section formatting). If you check the box for “Distinguish style source,” you
can easily see what formatting is defined in the style and what has been
directly applied.
-
To display the task pane in Word 2002 or 2003, View |
Task Pane (or click on the New or Styles and Formatting
toolbar button to open one of those task panes), then click the down arrow
at the top of the task pane and choose Reveal Formatting. Even
easier, just press Shift+F1, which now opens this pane.
-
To display the task pane in Word 2007 and above, press Shift+F1
or click the Reveal Formatting button in the Style Inspector
dialog (see below). Alternatively, you can add a button to the Quick Access
Toolbar (QAT); find it under “Commands Not in the Ribbon.”
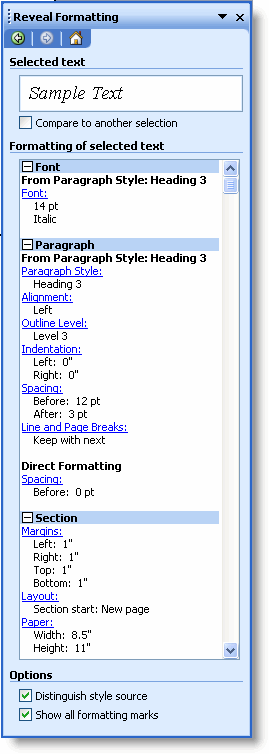
Figure 1. Reveal Formatting task pane with style source
distinguished
Styles
As a general rule, you want to avoid direct formatting. If
you use styles to do your formatting and avoid manual formatting as much as
possible, you will find that simply looking at the style name will usually tell
you all you need to know. You can see which style is applied to the text at the
insertion point by looking at the Style box on the Formatting
toolbar in Word 2003 and earlier, the Styles and Formatting task pane in
Word 2002 and above, or the Styles group on the Home tab in Word
2007 and above (you can also add the classic Style dropdown to the Quick Access toolbar in
Word 2007 and above). The Styles and Formatting task pane has the added advantage
that, if you mouse over the name of a style, a popup will give you a description
of the style formatting. The Style Inspector and Style Area provide additional
ways to get information on styles.
Style Inspector
Word 2007 added a new dialog that helps distinguish
direct and style formatting and allows you to remove it selectively. To open the
Style Inspector, display the Styles task pane by clicking on the dialog
launcher arrow in the bottom right corner of the Styles group on the
Home tab or by pressing Alt+Ctrl+Shift+S. In the bottom left corner of the task pane are three buttons.
Style Inspector is the middle one (the Style Inspector button can also be
added to the Quick Access Toolbar, but only through the Customize dialog; there is no
right-click option to “Add to Quick Access Toolbar”). It opens the dialog shown
in Figure 2.
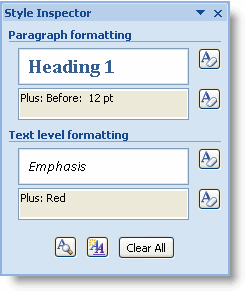
Figure 2. The Style Inspector dialog
In the example above, red font color has been applied to the
entire paragraph as direct formatting, while the Emphasis character style has
been applied to a single word. The Style Inspector allows you to remove the
direct font formatting without removing the character style (as opposed to using
Ctrl+Spacebar, which would remove both).
Important Note: The Style Inspector will work
only if “Keep track of formatting” is enabled at Office Button | Word
Options | Advanced: Editing options (Word 2007 or File |Options
| Advanced: Editing options (Word 2010 and above). Many users are accustomed to having
“Keep track of formatting” disabled because, in Word 2002 and 2003, enabling
it resulted in multiple pseudo-styles showing up in the Styles and
Formatting task pane; in Word 2007 and above, the Options… button in the
Styles pane allows you to select whether you want to see formatting
listed or not (and to specify exactly which types of formatting you want to
see). So there is no need to disable this option in Word 2007 and above.
Style Area
One of the most useful tools when working with an entire
document is the Style Area, which is available only in Normal (Draft) and
Outline views. As shown in Figure 3, the Style Area displays the style for each
paragraph in your document so that you can scroll through and check for
incorrect or improperly formatted styles. Double-clicking on a style name in the
Style Area will bring up the Style dialog box with the current style selected.
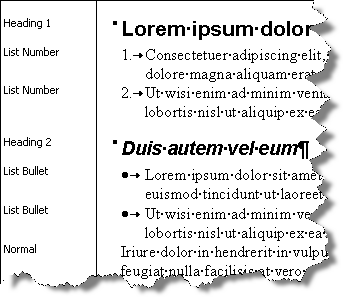
Figure 3. The style area
To display the style area:
-
In Word 2003 and earlier, go to Tools | Options |
View and set “Style area width” to a value greater than 0" (1" is
usually sufficient unless your style names are very long).
-
In Word 2007, go to Office Button | Word Options |
Advanced | Display and set “Style area pane in Draft and Outline views”
to a value greater than 0”.
-
In Word 2010 and above, go to File | Options | Advanced |
Display and set “Style area pane in Draft and Outline views”
to a value greater than 0”.
Other clues
Nonprinting characters
One of the most important and helpful visual cues in Word is
the
display of nonprinting characters. The Show/Hide ¶ button toggles
this display on and off. In Word 2003 and earlier, this button is on the
Standard toolbar; in Word 2007 and above, it is in the Paragraph group on the
Home tab.
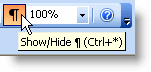
Figure 4. The Show/Hide ¶ button
The meaning of each of the nonprinting characters (or
“formatting marks,” as they are known in Word 2000 and above), is explained in “What
do all those funny marks, like the dots between the words in my document, and
the square bullets in the left margin, mean?”
With these symbols displayed, it is much easier to find out that, for example,
your document is printing an extra
blank page because you have half a dozen empty paragraphs at the end.
Text boundaries
Another visual cue that I find extremely helpful (indeed
feel panicky and lost without) is text boundaries in Print Layout view
(see Figure 5). This is helpful not only in visualizing page margins but also
for seeing the outlines of graphics, including text boxes (even
when they're not selected), and table cell boundaries (even when
gridlines are not displayed). Some people evidently prefer the cleaner page
appearance they get without this display, but for a truly WYSIWYG view, you can
always switch to Print Preview. To display text boundaries:
-
In Word 2003 and earlier, go to Tools | Options |
View and check the box for “Text boundaries.”
-
In Word 2007, go to Office Button | Word Options |
Advanced: Show document content and check the box for “Show text
boundaries.”
-
In Word 2010, to to File | Options | Advanced: Show
document content and check the box for “Show text
boundaries.”
-
In Word 2013 and above, the path is the same as for Word 2010, but
don't bother: the way text boundaries are displayed has changed with the
implementation of a new layout engine, and the text boundaries are very
distracting and much less helpful.
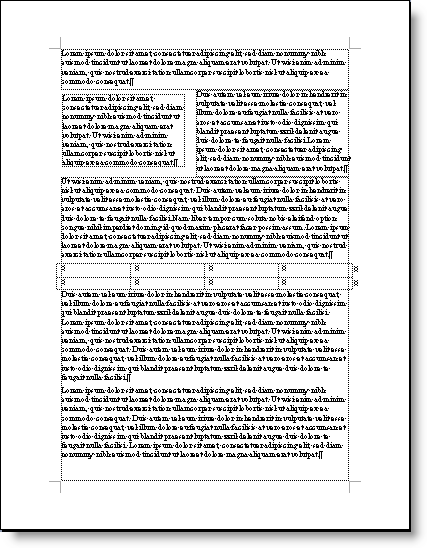
Figure 5. Display of text boundaries showing text box
and table
Other Options settings
While you’re looking at the Options, there are several
others you may want to enable:
-
Graphics: Some graphics may not be displayed if
you don’t have specific options checked. For more on this, see
this article.
-
Object anchors: You will probably want to check
the box for “Object anchors,” which help you see what paragraph a floating
graphic is anchored to. This check box is at Tools | Options | View
in Word 2003 and earlier and at Office Button | Word Options | Display
in Word 2007 and File | Options | Display in Word 2010 and above.
-
Bookmarks: If you choose to display bookmarks,
the bookmarks you have created will be indicated by heavy grey brackets (or
a heavy grey I-beam for single-point bookmarks). Hidden bookmarks (those
created by Word) are not displayed. You may prefer to display bookmarks only
when troubleshooting because they are ugly and distracting (and hidden
bookmarks are not marked, anyway). To display bookmarks in Word 2003 and
earlier, check the box at Tools | Options | View; in Word 2007 the
check box is at Office Button | Word Options | Advanced: Show document
content; in Word 2010 and above, it is at File | Options | Advanced:
Show document content.
-
Vertical and horizontal rulers: The rulers can be
extremely helpful, especially the horizontal ruler, which shows indents and
tab stops. The vertical ruler is displayed only in Print Layout view (for
more, see “Ruler
of all you survey”).
-
In Word 2003 and earlier, the check box for the
vertical ruler is at Tools | Options | View. The horizontal ruler
is toggled with View | Ruler. If the vertical ruler is displayed,
it will be toggled on and off (along with the horizontal ruler) by
View | Ruler.
-
In Word 2007, the check boxes for both horizontal and
vertical rulers are at Office Button | Word Options | Advanced:
Display, and the Ruler check box in the Show/Hide
group on the View tab toggles both rulers on and off.
-
In Word 2010 and above, the check boxes for both horizontal and
vertical rulers are at File | Options | Advanced:
Display, and the Ruler check box in the Show/Hide
group on the View tab toggles both rulers on and off.
-
Status bar: The status bar at the very bottom of
the Word screen in all versions of Word is quite helpful. In Word 2003 and
earlier, display of the status bar is toggled at Tools | Options | View.
In Word 2007 and above, the status bar is always displayed (it cannot be toggled off),
and it is user-configurable: right-click on it and choose which items you
want displayed.
-
ScreenTips: There are actually two different
kinds of popups in Word, both called ScreenTips or “tooltips.”
-
One type of ScreenTip, undoubtedly helpful, but not
really document-related, is the “tooltip” that pops up when you mouse
over a toolbar button (see an example in Figure 4). These are turned on
and off with Tools | Customize | Options: Show ScreenTips on toolbars
in Word 2003 and earlier. Word 2007 offers a menu of options at
Office Button | Word Options | Popular:: (1) Show feature
descriptions in ScreenTips, (2) Don't show feature descriptions in
ScreenTips, and (3) Don't show ScreenTips. The “feature descriptions”
are the so-called “Super Tooltips” that provide more information about
what a feature does; these are really quite helpful. These options are
found at File | Options | General in Word 2010 and above.
-
The other type of ScreenTip is the type that pops up
to show you the content of a footnote or comment when you mouse over a
footnote reference mark or comment marker, information about tracked
changes, the target of a hyperlink, and the like. In Word 2003 and
earlier, these are toggled with Tools | Options | View: ScreenTips.
In Word 2007, turn them on or off with Office Button | Word Options |
Display: Page display options: Show document tooltips on hover. In
Word 2010 and above, the setting is File | Options | Display: Page display
options: Show document tooltips on hover.
Other visual cues
-
With the insertion point in a given paragraph or word,
or with a portion of the text selected, you can look at the Formatting
toolbar (in Word 2003 and earlier) or Home tab (in Word 2007 and
above) to see
what style is in use, what font and point size are being used, and whether
bold or italic formatting is in effect.
Note: Although you can usually tell just by
looking at it whether text is bold or italic, problems can often arise from
incorrect formatting of the paragraph mark itself, so if you select the
paragraph mark, you can then look at the bold or italic button to see
whether it is on or off.
-
With the insertion point in a paragraph, you can see
from the ruler whether any paragraph indents are in effect and where tab
stops are set.
-
If you select the entire paragraph, you can see (from
the extent of the block selected) whether the paragraph has some Spacing
Before or After.
-
In Word 2003 and earlier, if you have
added buttons to apply “Keep with next,”
“Keep lines together,” and/or “Page break before” properties to a paragraph,
the state of these buttons (which are toggles) will show you whether a given
paragraph has any of these properties applied.
By using all these visual cues, and by understanding at
least a little of the difference between the Word and WordPerfect object models,
you will gradually be able to wean yourself from the need for “Reveal Codes.”
This article copyright © 2000, 2002,
2009, 2011, 2014, 2023 by
Suzanne S. Barnhill.
|