

|
|
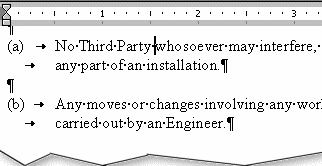
Ruler of all you survey: How to make the best use of Word’s rulersOverviewThe way in which most users set a hanging indent is as follows. They type until they get to the beginning of the second line of the paragraph, and they press Tab. Then they type to the beginning of the next line and press Tab. And so they continue. They end up with paragraphs which (with non-printing characters displayed) look something like this:
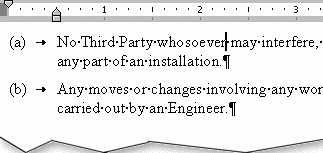
Figure 1. How not to set a hanging indent! Later, if they need to add or delete a word somewhere, or paste it into another document with different margins, the text will go all over the place, and some poor soul will have to spend a great deal of time reformatting the document. To avoid spaghetti indents, set indents using the ruler:
Figure 2. These indents have been set properly, using
the ruler. If you work for a company of any size at all, then simply getting your staff to use the ruler properly will save them many hours every week, and significantly increase your company's profitability. What rulers? Where?Although Word’s rulers, both horizontal and vertical, are displayed by default, you or the person who set up or previously used your computer may have hidden them to maximize usable screen area. If you don’t see anything at the top or side of your screen that looks like a ruler, here’s what to do: Word 2003 and earlier
Want the best of both worlds? Want to see the ruler only when you need to use it? Toggle the ruler display off on the View menu, and check the box for “Provide feedback with animation” on the General tab of Tools | Options. You will then see just the edge of one or both rulers. When you carefully mouse over this edge, the ruler will slide into view. Word 2007 and above
Using the horizontal rulerUsing the horizontal ruler can save you a lot of trips to the Tabs, Paragraph, and Page Setup dialogs (or make it easier to get there). It is also useful when working in tables or columns.
Setting tabsFor a full explanation of how to set tabs using the ruler, see Setting tabs. When you need to use the Tabs dialog to refine your tab formatting by adding tab leaders or fine-tuning the location of tab stops, you can access this dialog from the ruler. Double-click on any tab marker on the ruler or on the grey portion at the bottom of the ruler. The chief drawback to this method is that it results in setting a tab stop if you have clicked where there was not already a tab marker. Setting paragraph margins and indents
By default, ruler sliders snap to “detents” or “click-stops” at intervals (the interval is ⅛″ or .17″ if you have selected inches as your unit of measurement). But you can override this behavior by pressing Alt while dragging. Not only does this allow the sliders to move freely, but the relative measurements are displayed as you drag (as illustrated below).
Setting page marginsThe horizontal ruler can also be used to set left and right page margins, but only in Page Layout (Print Layout) view. If you hover your mouse just above the Left Indent or Right Indent marker, you will see that the pointer changes to a double-headed horizontal arrow, and the ScreenTip says “Left Margin” or “Right Margin.”
Dragging will then change the corresponding margin. Once again, pressing Alt will allow you to see the relative measurements as you drag. You should note an important difference between this action and the action of setting tabs or paragraph margins or indents using the ruler. When you change paragraph formatting or set tabs without text selected, your actions apply to the paragraph in which the insertion point is located. If you have multiple paragraphs selected, the formatting is applied to all the selected text. Because page margins are a section property, however, when you change margins, whether or not you have text selected, the margins will be changed for the entire document (or the current section if there is more than one). This may surprise former WordPerfect users, who have been accustomed to being able to change page margins for selected text (Word accomplishes the same thing by changing the paragraph margins).
Using the rulers to format tables and columnsIn the same way, you can resize newspaper-style columns and table rows and columns using the rulers. Although it is generally easier to drag row and column borders within a table (especially given the risk of dragging paragraph margins instead of column margins on the ruler), there is no other way to size newspaper-style columns outside the Columns dialog. And here, too, you can press Alt and press and hold the left mouse button to get a display of the current dimensions of rows and columns. For newspaper-style columns, what you can do with the ruler depends on whether or not you have checked “Equal column width” in the Columns dialog; if this option is not checked, you can adjust the width of each column and the distance between columns independently; if it is checked, then dragging one marker drags all equally. (For more on working with columns, see The strait and narrow: using columns.) Using the horizontal ruler as a diagnostic toolIf you choose not to display the horizontal ruler, you are missing out on one of the most informative features of the Word workspace. Because it displays paragraph indents and tabs, it can be very helpful in troubleshooting problems with paragraph formatting. And if you’ve ever had text disappear entirely from a table cell because of a negative right paragraph indent combined with right-aligned text, you’ll know how helpful the ruler can be in troubleshooting table formatting. Naturally there will be times when you want to eliminate clutter (though really this is what Print Preview is for), but as a general rule, you would be well advised to keep the rulers visible. This article copyright © 2000, 2016, 2023 by Suzanne S. Barnhill. Portions of this article (including the Overview and screen shots) were added by Word MVP Dave Rado when it was originally published on the Word MVP FAQ site (of which he was Webmaster). |