

|
|
|
Most Word users who are old enough to have used a typewriter will have had some experience in setting tab stops in order to position text to line up accurately without having to use multiple spaces. In Word (or any other word processor), this becomes even more vital because in most cases you will be using proportional fonts. Most typewriters produce text in which every character (including the space) is the same width; the equivalent in word processing terms is a monospaced font, such as Courier New. Although it is possible, using a monospaced font, to line up text using spaces alone, tabs are much more efficient. Tabs are also the only way to accurately line up text in a proportional font because the characters have varying widths. Why set tabs? Why set tabs?By default, a Word document has built-in tab stops at half-inch intervals. You can change the default spacing in a given document using the spin box in the top right corner of the Tabs dialog, but in general it is preferable to avoid using the built-in tab stops at all. Have you ever tried pasting from someone else’s documents into your own, or even just changing the page margins, or the font, and found that their tabbed lists no longer line up—so you have to waste a lot of time reformatting them? If so, it’s because the person who created the document didn’t use tabs properly. If you use the built-in tabs, (and even, as many people do, use the space bar to simulate right-aligned tabs), and therefore end up tabbing once on some lines, more on others, depending on how much text you're typing on a given line, then the tab positions will be determined by the document's margins and by the font in use. The golden rules when it comes to using tabs are: do set the tab positions yourself, and don’t press the tab key more than once between any two blocks of text: set a tab position instead. You can easily see whether a tabbed list has been created properly by clicking the Show/Hide ¶ button , so you can see where the tabs are.
Figure 1. How not to use tabs
Figure 2. These tabs have been set properly Types of tabsThe Tabs dialog lists five kinds of tab stops, as follows:
Alignment tabs are a new feature introduced in Word 2007. For more, see “A new kind of tab” below. How to set tabsLike many tasks in Word, setting tabs can be done in more than one way. Which one you use will mostly depend on which is most intuitive for you. The Tabs dialog is the ultimate way to set tabs. Here you can type in an exact figure (down to hundredths of an inch), choose the kind of tab you want, and set a tab leader if desired. It is the only way to set a tab leader, which is typically a dotted line (period leader) filling the space taken up by the tab, used most commonly in tables of contents, but there are four different choices of tab leader available. It is also the only way to set a bar tab in Word 97 and earlier versions.
Figure 3. The Tabs dialog in Word 2010 There are several ways to access the Tabs dialog in Word:
Unless you want to set a tab leader, however, it is rarely necessary to visit the Tabs dialog. Usually the easiest way to set tabs is using the ruler bar. If you do not have the ruler displayed, display it as follows:
On the left side of the ruler is a button with an icon that looks like an L. This button shows which kind of tab stop is currently selected; the default is a left tab. Click anywhere on the ruler, and you will have set a tab stop; you will see a small L on the ruler. By default, the tab stop will be set at one of the ruler markings or halfway between them. If your ruler display shows inches, this means that tabs can be set only at intervals of 1/16″ (which is usually close enough) unless you press the Alt key while dragging the tab marker; when you do this, you will see measurements displayed, and you can set tab stops just as precisely as in the Tabs dialog.
At least three other types of tab stops can be set using the ruler. If you click on the L button, it will change to the icons that represent center, right, and decimal tab stops. These are, respectively, an upside-down T, a backwards L, and an upside-down T with a dot (see Figure 2 for an example of a decimal tab stop). When you have reached the kind you need and click on the ruler bar, you will place that type of tab stop. In Word 2002 and above, the bar tab has also been added to the rotation, along with buttons for first-line and hanging indents. (My personal feeling about the last two is that they are entirely superfluous—it is much easier just to drag the corresponding markers on the ruler—and rather tricky to use, not to mention that they result in requiring additional clicks on the button to get back to the left tab stop.) You can move these tab stops as needed; just click on one of the markers and drag it where it is needed. This is very handy if you want to set up a simple table using tabs: you can enter data such as the following:
After you've finished the whole list and can see where the tab stops need to be, you can select the entire block and place the tab stops as needed.
One of the things I especially like about Word is that you can set tab stops beyond the right page or paragraph margin, which makes it very easy to do, say, invoices with a multi-line entry that wraps short of the right page margin (because the paragraph has a right indent), while the money amount is at a right tab stop at the right page margin (beyond the paragraph margin). This is also useful for long entries in tables of contents.
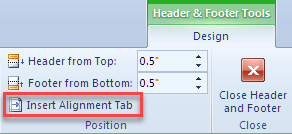
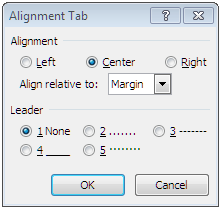
A new kind of tabWord 2007 introduced a new kind of tab, the alignment tab. When you set an ordinary tab, its position is defined relative to the left margin of the page. If your Letter-sized page has 1″ margins, there is 6.5″ of space between the margins. If you set a center-aligned tab centered between the margins and a right-aligned tab at the right margin, those tabs will be at 3.25″ and 6.5″ (as shown in Figure 3 above). If you change the page margins, the tab positions will not change. The center-aligned tab will no longer be at the exact center, and, if you have increased the side margins, the right-aligned tab will be outside the margin and (as noted above), in Word 2013 and above, will be ignored. Where you are most likely to use this combination of tab stops is in a header or footer, and where this becomes especially important is in a document in which you have some portrait and some landscape pages. If you set the tab stops to be correct for the header/footer of a portrait page, they will not be correct for landscape. One way to get around this in Word 2003 and earlier is to use a three-column borderless table with the center column centered and the right column right-aligned. If the table width is set to be 100%, it will expand or contract to match the margin width. This does work, but it generates a processing load and can cause Word to be sluggish. The alignment tab introduced in Word 2007 addresses the need for a tab that adjusts automatically. To see how it works:
Figure 4. The Insert Alignment Tab button in Word 2010
Figure 5. The Alignment Tab dialog in Word 2010
Tabs and tablesYou might think that using tables would be a substitute for tabs, and to a large extent it is, but you can also set tab stops in tables; the trick is that you have to use Ctrl+Tab to get to the tab stop, because Tab alone takes you to the next table cell. Also, if you set a decimal tab in a table, the cell contents (which must be left-aligned), will jump to that tab automatically: you don't have to enter a tab character. A borderless table has one other major advantage over a tabbed list—the text in it can word-wrap. You may very well start out using a tabbed list, then realize halfway through that you need the text to word-wrap. Provided you have used tabs properly, it is almost a one-step process to convert the tabbed list to a table:
But if you tabbed more than once between any two blocks of text, the resulting table will be a mess. First-line indentsOne more word of advice about tabs: If you are accustomed to indenting the first line of a paragraph using a tab, don't do it. The proper (and timesaving) way to do this in Word is to use a first-line indent. You can set this in the Paragraph dialog or by dragging the first-line indent marker on the ruler bar. This is the top triangle of the three buttons to the right of the tab selector button. If you hover your mouse over it, the ScreenTip will say “First Line Indent.” (The other two are for Left Indent—there's a corresponding Right Indent on the other side—and Hanging Indent.) This article copyright © 2000, 2016, 2018 by Suzanne S. Barnhill. Portions of this article (including the introductory paragraph and the screen shots) were added by Word MVP Dave Rado when it was originally published on the Word MVP FAQ site (of which he was Webmaster). |