

|
|
Adding to, Multiplying, and Dividing Tables of ContentsI am told by a reliable source that Word users frequently search for information on “sections in a table of contents.” Search strings also include “Update my TOC with a new section” and “Create a new TOC for each section of my document.” There is a Microsoft Help article that attempts to answer these rather disparate questions about “adding sections to a table of contents,” but since those who wrote it seem to be unclear on what users are actually trying to do, the article is reportedly “performing poorly.” It seems to me that the underlying problem is the use of the word sections. In Word, section is a term of art [that is, it has a specific, defined meaning that is different from the generally accepted meaning of the word in non-technical English], used to describe a portion of a document between section breaks. A newly created document contains only a single section; once a section break is added, it contains two sections. Each section can have formatting different from other sections: it can have different header and footer text, different margins, a different number of columns; numbering can be restarted or the number format changed. But most of this is irrelevant to tables of contents. If you have reached this article by searching for “add sections to a table of contents,” let’s consider what you may actually be trying to do.
This article will address all those issues, but in some cases it will refer you to other articles that contain more detailed information.
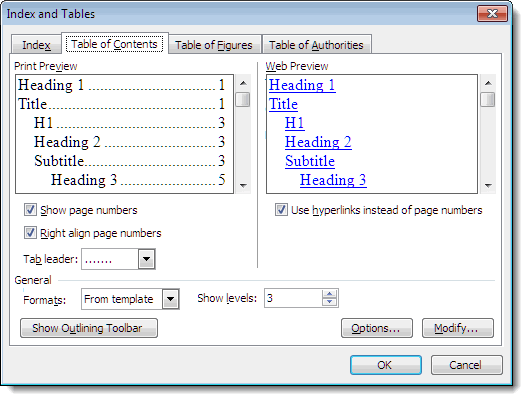
Add entries to a table of contentsWhether this is your own document or one someone else created, or one you created so long ago that you can’t remember what you did or how you did it, there are several basic steps that will help you add your new headings. Update the TOCIn many cases, all that will be required is to update the TOC field. To do this, click in the TOC and press F9. This works in any version of Word. In Word 2007 and above, you can also click the Update Table button in the Table of Contents group on the References tab. If you have used one of the “Automatic Table” content controls, there’s an Update Table button at the top of the control. In any version of Word, if you get the dialog box shown in Figure 1, choose the radio button for “Update entire table.”
Figure 1. Update Table of Contents dialog Is it a TOC field?If you don’t get the Update Table of Contents dialog, or if nothing appears to happen, then you need to determine is whether the TOC is actually an automatically generated one (a TOC field) or a manually created one. Press Alt+F9 to display field codes in the document. If your TOC is an automatic one, you will see something like this: { TOC \o “1-3” \h \z } If you see this, then you can press Alt+F9 to toggle the display back to field results. If you don’t see this, you’ll still need to toggle fields back, but what you will have learned is that your TOC is a manual one, so you will not be able to update it automatically; you’ll have to add the new entries manually. Alternatively, you may want to start from scratch with an automatic TOC; the articles referenced above can help you with that. Wrong styles applied?So what happens if you have determined that your TOC is a TOC field, but when you update it, your new headings aren’t added? Then you have to ask yourself how they are different from the headings that are already in the TOC. If the existing TOC is based on Word’s built-in heading styles, did you apply those same styles to your new headings? Or perhaps the TOC is based on custom styles, and you should have used those instead? You need to be able to see what styles are applied to the original headings and the new ones. There are several ways to see styles in a document; for more information see “Display document styles.” If you find that your new headings use a different style from the old ones that are in the TOC, then you just need to apply the styles used for the old headings.
TOC not based on styles?If the TOC field you saw when you pressed Alt+F9 looked very different from the one shown above, then it’s possible the TOC is based on TC fields or is in some other way different from the standard TOC. You may want to look at the section on “Controlling what goes into the TOC” in my article on “TOC Tips and Tricks.” If what you saw when you displayed the field code was very complex, my article “Customizing your table of contents with switches” may help you make sense of it. If even that doesn’t help, you may want to try starting from scratch. In a copy of your document, delete the existing TOC and insert a new one, selecting the options that will include the headings you want included; there is an explanation of these options in “Controlling what goes into the TOC.” Create multiple TOCs in the documentThere are several different situations in which you might want more than one TOC in a document:
Multiple overall TOCsIf you want a TOC to include every single heading in your document, then you just need to include the requisite number of levels in the TOC. Let’s say that you have (shudder) nine levels of headings. So in the Table of Contents dialog, you should change the number of levels from the default 3 to 9. Alternatively, you can manually edit the TOC field to change “1-3” to “1-9.” For more detail on this see “Controlling what goes into the TOC.”
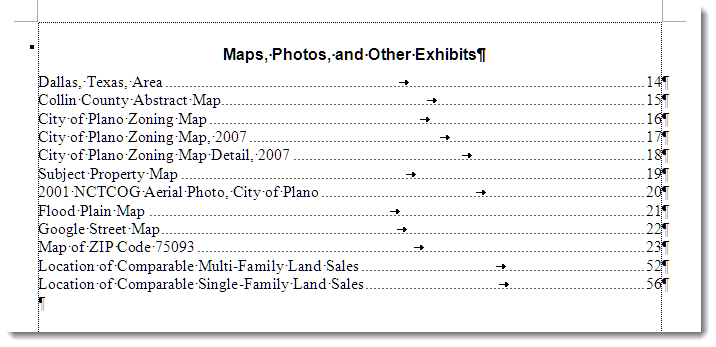
Figure 2: Table of Contents dialog tab of Index and Table dialog For your “summary” TOC, which includes fewer levels, you will set the number accordingly. It really is just as simple as that, provided that you are content to use the same TOC styles for both TOCs. That is, the Level 1 headings will appear the same in both TOCs, as will the Level 2s and so on. That’s because a given TOC style, such as TOC 1, has the same formatting throughout the document (just as Normal or Heading 1 or any other style is the same throughout); you can’t customize it differently for different TOCs. If you want the headings at the same level to be formatted differently, then you will need to apply different TOC styles. If you’ve used all the styles in your inclusive TOC (the worst-case nine-level TOC), then you don’t have much choice, but let’s say you used “only” six levels in the inclusive TOC and want three levels in the summary TOC. Theoretically, you could have entirely different formatting for that TOC by using TOC 7, TOC 8, and TOC 9 for Levels 1-3. You do this by typing 7, 8, and 9 beside Headings 1, 2, and 3 in the Table of Contents Options dialog. Limited-content TOCsMany documents (especially books) contain TOCs that list specific types of content. The most common is the Table of Figures, and Word provides a special feature for creating these. But you may also want to have a List of Tables, List of Illustrations, or the like. Ordinarily, these will be created just the same way as a Table of Figures.
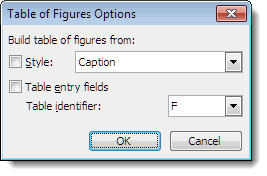
Figure 3. Table of Figures tab of Index and Tables dialog Figure 3 shows the default settings for the Table of Figures dialog. As you can see, a default Table of Figures is based on captions with a caption label of “Figure.” But you can also select a different caption label to build a list of those captions; that is, if you want a List of Tables, you select “Table” as the caption label. (“Table” and “Equation” are the other built-in labels, but if you have used New Label… in the Caption dialog to create a new label, you will see it listed as well.)
Figure 4. Table of Figures Options dialog Figure 4 shows the Table of Figures Options dialog (reached by clicking Options… in the Table of Figures dialog). Here you can get other options for selecting the entries in your list. If your captions or table titles or illustration descriptions were not created using the Caption feature, but you have used a specific style for all the captions or titles of this type, you can select that style in the dropdown and check the box for Style.
Figure 5. TOC based on Heading 4
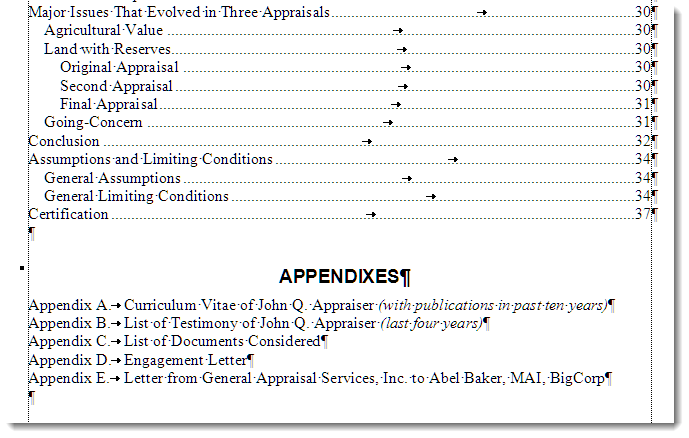
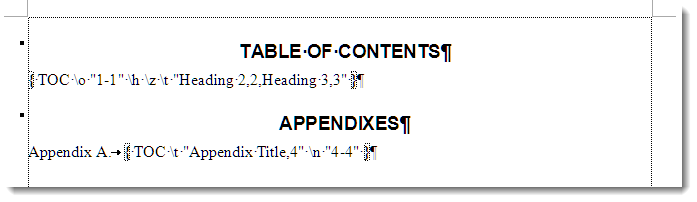
Figure 6. Table of Figures Options dialog for Figure 5 Figure 5 shows an example of a TOC based on a specific style, in this case, Heading 4. If the TOC is inserted using the Table of Figures Options dialog settings shown in Figure 6, the field code is: { TOC \h \z \t "Heading 4" \c } The remainder of the settings in the Table of Figures Options dialog are of use only if you have inserted TC fields as the basis for your Table of Figures, List of Tables, or the like. The strength of the TC field is that it allows you to specify a “table identifier” by using the \f switch (see “Field codes: TC (Table of Contents Entry) field” for more). So you can use different identifiers for the TC fields for figure captions, table titles, illustration descriptions, etc. When you use Alt+Shift+O to open the Mark Table of Contents Entry dialog, you will see that it gives you a choice of table identifier; the default is C; the default shown in the Table of Figures Options is F. But you can use F for figures, T for tables, I for illustrations, and so on. It is admittedly unlikely that you will do so; this Word feature is an ancient one, predating the features that allow you to insert captions easily and, equally easily, create tables of figures based on them. And here we come to the secret that you may already have discovered if you examined the field code for a table of figures: it’s really just a specialized table of contents. That is, with the default settings, it looks like this: { TOC \h \z \c "Figure" } The \c switch in a TOC field allows you to specify which caption the table is based on (the field code for the TOC shown in Figure 5 had the caption label set to “(none)”). While you could construct the field manually, you will doubtless feel that using the Table of Figures dialog—checking boxes and selecting from dropdown lists—is a lot easier! If you find that some of your captions are not listed in the list (table of figures, list of tables, etc.) where you expect to see them, even after updating the TOC field, then you need to examine the missing captions to see if they are identical to ones that are listed. Press Alt+F9 to display the caption field code. It should look something like this: Figure { SEQ Figure \* ARABIC } If you’ve included a chapter number, it may look something like this: Table { STYLEREF 1 \s }-{ SEQ Table \* ARABIC \s 1 } If your missing captions don’t match the ones that are included, you can try to edit them manually, but you may find it easier to delete and reinsert them. For caveats regarding adding a table of figures, list of tables, or the like after the TOC in your document, see the Important Note in the “Add a TOC” section below. Chapter TOCsThis subject is well covered in the two following articles: Divide the TOC into parts or add a separate TOC to the existing oneUsers often want to create a single table of contents (or at least something that looks like a single table of contents) but also give the impression of dividing the TOC into sections. In some cases, this is just a matter of adding special formatting to the top-level entries. For example, you may want your Level 1 headings (Heading 1 by default) to be centered, bold, in a larger font, with more Spacing Before, and/or with a rule (border) below. All of these (including omitting page numbers for the top-level entries) can be accomplished by modifying the TOC style used for that level (TOC 1 by default). Find more information about this in “Controlling how the TOC looks.” In other cases, it may be necessary or desirable to build what looks like a single TOC out of separate parts, or you may want to add a separate TOC to the existing one. Add a TOCAs mentioned above, many documents have specialized listings, such as a table of figures or list of tables, in addition to a general TOC that lists the headings and subheadings in the document. Each of these listings contains entries from throughout the document; that is, the general TOC lists headings from page 1 (or page i if front matter is numbered separately) through the end of the book; the table of figures has entries from Figure 1 (which might be on page 1) through the last figure. But sometimes you may want a limited TOC for just a specific portion of the book, but you want it to appear to be part of the main TOC or at least immediately follow it. For example, suppose you have a general TOC that shows three levels of entries, all with page numbers. You want to include a list of the appendixes, but, because numbering is restarted in each appendix or because the actual appendix content is not present (all you have is a title page for each appendix, and the actual content will be added manually after the document is printed or converted to PDF), you want to omit page numbers from the appendix list. Also, because the appendix number and appendix title are in separate paragraphs, you want to include just the appendix title style and add the numbering to the TOC style (see “Adding numbering to unnumbered headings”). This is easily enough done by using an otherwise unused TOC style (TOC 4, say) for the appendix headings, applying numbering to the style, and omitting numbering from Level 4. But suppose you also want to add a heading that says “APPENDIXES,” as shown in Figure 7. What you need now is a separate listing similar to a table of figures, list of tables, or the like.
Figure 7. TOC with separate list of appendixes
Figure 8. Field codes for Figure 7
Combine TOCsSuppose, however, that you want to include the separate appendix TOC at the end of your main TOC, but you want it to appear to be part of the main TOC. Naturally, you will not have the APPENDIXES heading between the two TOCs, but there will still be a space because of that paragraph mark that creates what appears to be an empty paragraph. When you click on that paragraph mark, you select the entire TOC, and if you deleted it, you would delete the TOC. If you carefully select just the paragraph mark and delete it, the space between the two TOCs will close up, but you will lose the numbering of your first appendix, and the second one will become Appendix A. The trick is to select that paragraph mark and format it as Hidden. When you do that (and then hide nonprinting characters and Hidden text by clicking Show/Hide ¶ again), the space will be closed up, and your appendix listing will be intact and will immediately follow the main TOC with no intervening space. There are other ways to accomplish the same thing, and how you do it can depend on how your TOC is formatted. A great deal of trial and error seems always to be required in creating and formatting TOCs, especially if you don’t do it often! More informationFollowing are some articles that explore other aspects of TOC creation and formatting:
This article copyright © 2012, 2014, 2023 by Suzanne S. Barnhill. |