

|
|
The strait and narrow: using columns in WordWhen you open a new blank document in Word, you begin typing at the left side of the screen/page and continue typing to the right margin, where Word wraps your text back to the left so you can start again. All your lines of text are full width. But sometimes you need to divide your text into two or more columns. Types of columns (tables, snaking columns, or ??)Word gives you several different ways of lining up columns of text. Which one you use depends on what you want the text to do. TabsIf you want to enter text in one column, then text in another column on the same line, then more text in the first column (but on the next line), and so on, and if each of the entries will fit on one line, you may be able to align the columns using tabs. What you’re doing here is creating a “tabbed table”:
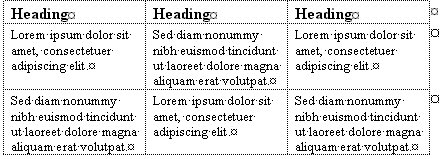
Just be sure you set a specific tab stop for each column location; don’t use Word’s built-in tabs. TablesIf you want to be able to enter some text in one column, then text in another column aligned with it, then text in the first column again, then the second (and possibly a third, fourth, or more), and if the text in each column must be able to wrap to the next line, then what you want is a table. A table allows you to align text vertically as well as horizontally. Whenever you need to “synch” the columns, you begin a new row.
Table columns are especially good for things like opera librettos, where you need the text in the original libretto and the translation to line up with each other vertically. For more on creating tables, see this article for Word 2003 and earlier and this one for Word 2007 and above. Text box columnsIt is possible to get text to flow from one Text Box to another. To do this, click on the first Text Box, then click on the Link button on the Text Box toolbar that will now be visible, and click on the second textbox. The idea of Text Box columns is that, unlike snaking columns (which are covered in detail below), they can be used to cater for articles which start on page 1 of a publication and continue in the middle of page 14. An example is to be found in the (appallingly formatted!) Newsletter Wizard that is supplied with some versions of Microsoft Office (Word 2007 has no wizards, but there are plenty of equally appalling templates in the Template Gallery at Microsoft Office Online). However, Text Box columns don't work well and are best avoided; there is also a firm limitation in Word of 32 linked text boxes. If you need the ability to flow text between non-consecutive pages, you will save yourself a lot of heartache by using a DTP package such as Microsoft Publisher or Adobe InDesign. For most purposes, however, snaking columns work admirably. Snaking columnsIf you want the text to fill the first column and then snake into the next and fill it, continuing from Column A to Column B, then Column A on the next page, then you want newspaper-style columns, the subject of this article. (Note that this type of columns is not appropriate for text to be aligned vertically across the page; for that you need to use a table).
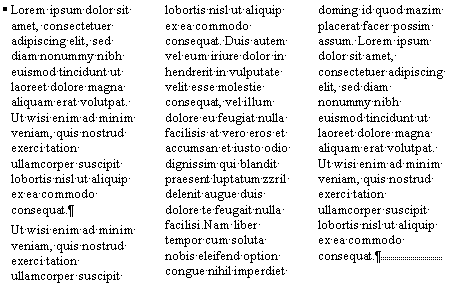
If you can make any sense of the above passage, Parallel columnsIf you are coming to Word from WordPerfect, you may be used to having another option: parallel columns. Word doesn't offer this option, but you can achieve the same effect using a one-row table with the required number of columns. Be aware, though, that Word can be uncomfortable with very long single-row tables, which may lead to document corruption. Usually you will want to start a new row occasionally, anyway, to line up text in the two (or more) columns. How many columns?The most common reason for using newspaper-style columns is to create (as the name suggests) something like a newspaper. Dividing the page width into narrower lines allows you to use smaller type without creating an unreadable line length. (A general rule of thumb is to have no more than 1½ alphabets, or 40–60 characters, in a line.) For some documents, such as newsletters, the number of columns can vary, and columns may be of unequal widths. For other documents, such as a three- or four-panel brochure, it makes sense to have one column of text for each panel (though sometimes a heading or other design element or even an entire column will spread over two or more panels). However many columns you decide to have, and whether they are of equal or unequal widths, you can easily create them in Word. Getting startedSometimes you will want just one portion of your document to have multiple columns. We’ll discuss later how to accomplish that. For now, however, let's assume that your entire document will be multicolumn. For illustration purposes, let's say that it is a four-panel brochure on legal-sized paper in landscape orientation. Planning your columnsSince the document will be folded, you will want to allow enough space between the columns to leave a reasonable margin on each panel. This margin should be the same as the outside margin, meaning that the space between columns will need to be double the outside margin. By default, Word puts half an inch between columns, so you could make your outside margins a quarter of an inch, but that might be pushing the limits of your printer or a photocopier, so let's say you'll set 0.3″ left and right margins and plan to have 0.6″ between columns.
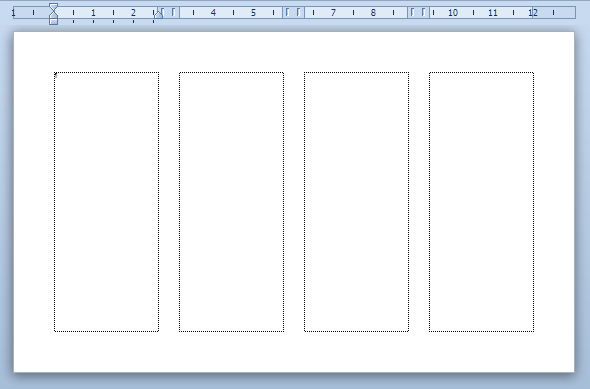
What you will seeIf you are working in Print Layout view and have text boundaries displayed, you will see that the text area has been divided into four rectangles (you will have to set Zoom to Page Width to see all four at once).
You will also, as shown above, see a change in the horizontal ruler. If you are working in Normal/Draft view, the only change you will see will be in the ruler, but when you type you will find that your line now wraps at a shorter length. For this reason, make sure that you don't have very large paragraph indents. If one of your styles, for example, has a one-inch indent both left and right (the default formatting for the Block Text style), there won't be much left of it in a column less than three inches wide! Completing the setupAt this point, you will still have only 0.5″ between columns. To change this to 0.6″, you will need to visit the Columns dialog. You can access it from the Format menu or Page Setup group on the Ribbon, as described above, but a quick way to access it is from the ruler: mouse over the space between columns until your pointer changes to a double-headed horizontal arrow and the ScreenTip says “Left Margin,” “Right Margin,” or “Move Column”; then double-click.
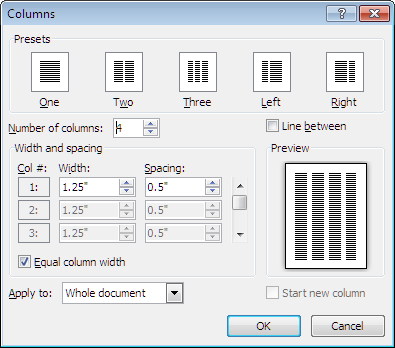
If it is not already checked, check the box for “Equal column width.” You'll notice that all the columns except Column 1 are now dimmed. Use the spin button to change the Spacing from 0.5″ to 0.6″ (note that Word adjusts the Width automatically). You’ve done all you need to do for now, but take a look around if you like before you OK out of the dialog. Notice that, if you don't choose “Equal column width,” you can change each column individually, along with the space between columns. You can also put a line between columns if you like; this line is of a fixed weight (which cannot be changed), but you can have it in any color you like, so long as it's black. Working with snaking columnsYou can now begin entering text. You will start typing in the first column. When it is filled, text will flow into the second column. If you’re editing text near the top or bottom of a column, the constant text reflow may be distracting (and Word may find it challenging to update the display accurately). In such cases, you may find it easier to work in Normal (Draft) view, where you can type in a single long column. This is all very well if you’re typing continuous text, such as a newsletter article, but this is supposed to be a brochure, so you probably have several distinct portions. You may want to work in the second or third or fourth column before you finish the first. So how do you get there? Insert a column break with Ctrl+Shift+Enter. This will take you to the top of the next column. Note that column breaks, like page breaks, inherit their formatting from the following paragraph; this can sometimes be a problem. Also, sometimes you will eventually fill the first column so full that there is no need and indeed no room for a column break; in that case you may have to delete it. A column break in a filled column can be difficult to see in Print Layout view, however, so you may need to switch to Normal (Draft) view to select and delete it. Multicolumn sections in single-column documentsSometimes you will want to divide just a portion of your document into more than one column. This is useful for long, narrow lists that would otherwise waste a lot of paper. Since columns are a section property, you will need to insert section breaks before and after the text you want to divide into multiple columns. Because you want the multicolumn section to be on the same page with the single-column text, these will need to be Continuous section breaks. Although you can insert these breaks manually, there is an easier way. If you wait till you have typed some or all of the text you want to format into multiple columns, plus at least one paragraph (it can be empty) of the following single-column text, then all you have to do is select the text to be multicolumn and choose the desired number of columns using the Columns button or dialog. Word will take care of inserting the section breaks for you.
Whenever you have a multicolumn section in the middle of a page, Word will automatically balance the columns for you. If you want the columns to break differently (that is, unevenly), you can either insert a column break (Ctrl+Shift+Enter) or control text flow using the “Keep with next” and/or “Keep lines together” paragraph properties.
If a multicolumn section ends a page (because you have inserted a Next Page section break or a page break or formatted the next paragraph as “Page break before” or used “Keep with next” to force text to a new page), columns will not be balanced unless you insert a Continuous section break in addition to whatever other break you have used. Some snaking column gotchasThere are a few limitations and danger areas you should be aware of when working with columns. Columns within columnsWhen you have divided your document or a portion of it into multiple columns, you can do almost everything you can do in a single-column document or section. You can use all the normal paragraph formatting (including borders), you can insert tables, wrapped or inline graphics, text boxes, equations, and so on. The only thing you can't do is have multiple columns within a column. Not even if you use a text box, since columns aren't permitted in text boxes, either. If you need to have multiple columns within a column, you will have to use either a table or tabs to align the columnar material. FootnotesAnother limitation of columns is that they don't play well with footnotes. Footnotes in a multicolumn document will be wrapped to the column width. Moreover, if the footnote occurs in a multicolumn section in a single-column document, that section will insist on being on a page by itself even though you have used Continuous section breaks before and after it. The workaround for this is so clumsy that you may well decide it is not worth it, but if you must combine footnotes with columns and insist on full-width footnotes (and especially if the multicolumn section is part of a primarily single-column document), here's how to solve the problem:
Headers and footersThis is not a problem with columns specifically, but whenever you have a short section in the middle of a page (which often happens when you use columns for just a portion of a document), you may develop problems with page numbering or other header/ footer-related aspects. That’s because headers and footers are a section property. Your multicolumn section has a header and footer, but because it isn’t at the top of the page, there is no way to access its header; because it’s not at the bottom of the page, you can’t get to its footer. If you suspect that header/footer problems are originating in these inaccessible locations, you have little choice but to remove one or both of the Continuous section breaks, deal with the problems, and then restore the breaks by selecting the text and reapplying the column formatting. Alternatively, using the information in the section above, you could force the multicolumn section to a page of its own (temporarily) by inserting a footnote! Or, more prosaically, you could temporarily insert a page break. Fix the header or footer, then delete the footnote or page break.
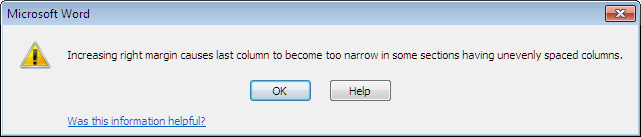
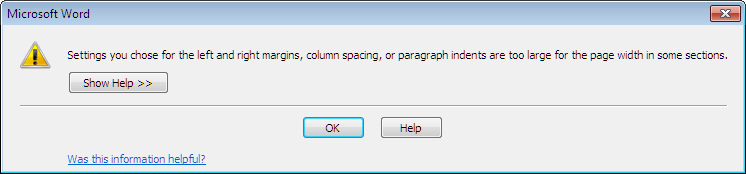
Headings spanning columnsIf you want a heading to span all of your columns, you need only leave it in the single-column section before your multicolumn section. If there isn’t a single-column section there already, you’ll need to create one. This is easily done by selecting the heading paragraph, clicking on the Columns button on the Standard toolbar or Page Layout tab, and selecting 1 column; Word will then create the necessary section breaks for you. But what if you want a heading to span just some of the columns? In our four-panel brochure example, suppose you want text to span two of the four columns. Once you have four columns, you can’t redivide just part of the page into two or three columns. You will therefore need to put your heading text into a text box or frame. For more information on this, see “I want the headings in my multi-column document to span the columns. How can I achieve this?” When columns go rogueUsers sometimes encounter a variety of problems in Word that all have the same general cause and can be solved in the same way. Among them is the appearance of one of the following error messages when trying to change page margins or orientation:
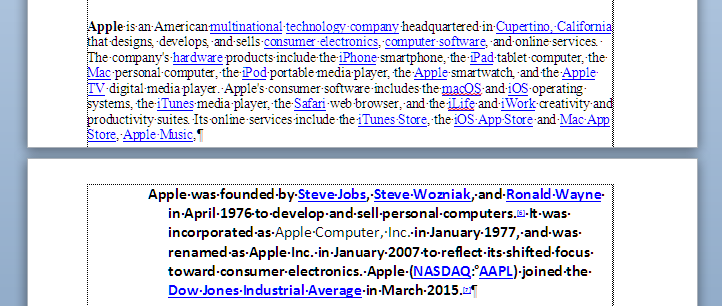
Error messages relating to columns An even more puzzling issue is that of a document in which it is not possible to type more than one page: at the bottom of the first page, text just disappears. Consider this document sample. It looks quite ordinary, but if you fill the last line on the first page (or press Enter), the second page disappears, along with any text beyond the first page.
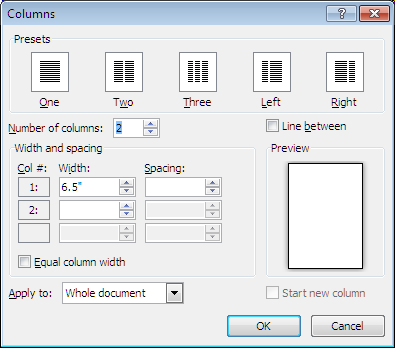
Problem document Obviously, the bottom margin on the page is anomalous. The Page Setup dialog shows that it is set to 0″. If you try to change it to something more reasonable, you get the “Settings you chose” error message above. If you try to change the orientation to Landscape, you get the “Increasing right margin” message (which in this instance is entirely irrelevant and bogus). The cause of all these problems is in the Columns dialog, where it can be seen that the document is set up to have two columns, and the left one is set to 6.5″, which is the full margin width. Obviously, if the first column takes up the entire available width of the page, there is no place for the second column to go (although it can’t be seen, there is also a manual page break at the end of the first page).
Columns dialog showing “Equal column width” not checked Although setting the number of columns to 1 would solve the immediate problem, the correct way to do it is to check the preset picture for One, which also has the effect of checking the “Equal column width” box, which ensures that the column width will adjust automatically as the margin width is changed. (You cannot check the “Equal column width” box manually for a single column; you have to either change the number of columns or use one of the preset buttons.) In all recent versions of Word, no matter how you create multiple equal columns, whether by using the Columns button on the Standard toolbar (Word 2003 or earlier) or the preset buttons in the Columns dropdown in the Page Setup group of the Page Layout tab (Word 2007 and later) or by setting up the columns through the Columns dialog, Word checks the “Equal column width” box in the dialog. In some earlier versions, however, using the toolbar buttons sometimes resulted in failure to check this box. As a result, it was possible for column width to be fixed at an exact amount that did not change when the page orientation or margins were changed or even when the number of columns was changed. This bug still unaccountably surfaces in current versions of Word, with the results reported above. In most cases, however, Word has gotten smarter: even if you have selected the Left or Right preset or have created uneven columns by adjusting the column widths manually, Word will adjust the column widths proportionally if you change the side margins (but it will give an error message if you try to change the page orientation from Portrait to Landscape). Moreover, Word will not let you set the width of one uneven column to the full margin width; if the margin width is 6.5″, the widest you can make a single column is 6″, and Word reduces the space between columns to 0″ to leave a 0.5″ second column. Consequently, it is hard to see how this sort of error arises, but when it does, the solution is in the Columns dialog. SummaryAvoid text box columns. Use snaking columns when you need text to flow from one column to another, and table or tab columns when you don't. Table columns are especially good for things like opera librettos, where you need the text in the original score and the translation to line up with each other vertically. If your document is doing something weird or you get one of the cited error messages, check the Columns dialog for the cause. This article copyright © 2000, 2016, 2017, 2023 by Suzanne S. Barnhill. Portions of this article (including the screen shots) were added by Word MVP Dave Rado when it was originally published on the Word MVP FAQ site (of which he was Webmaster). |